Building a CI/CD Pipeline with Jenkins
Table of Contents
- Building a CI/CD Pipeline with Jenkins
Pipeline Overview
In this guide, we will set up a complete Continuous Integration (CI) pipeline. We will understand the flow, set up the necessary servers (Nexus and SonarQube), and integrate them with Jenkins.
The CI/CD Flow
The pipeline follows a standard DevOps workflow:
- Code Commit: Developer writes code and pushes changes to a centralized repository (GitHub).
- Fetch Code: Jenkins detects the change and fetches the code using the Git plugin.
- Build: Jenkins builds the code using Maven (since it's a Java project).
- Unit Test: Maven executes unit tests included in the source code.
- Code Analysis:
- The code is scanned for vulnerabilities, bugs, and best practices using SonarQube Scanner and Checkstyle.
- Reports are uploaded to the SonarQube server.
- Quality Gate: SonarQube checks if the code meets quality standards. If it fails, the pipeline stops.
- Artifact Generation: If all checks pass, a verified artifact is generated and stored in the Nexus repository.
- Notification: The team is notified of the build status.
Tools Used
We will use the following tools for this example, but the concepts apply to any toolset:
- Jenkins: CI/CD Automation Server
- Git/GitHub: Version Control System
- Maven: Build Tool for Java
- SonarQube: Code Quality and Security Analysis
- Nexus: Artifact Repository Manager
Main Steps for Setup
To create this pipeline, we will execute the following steps:
- Set up Servers: Launch EC2 instances for Nexus and SonarQube using user-data scripts.
- Security Groups: Configure security groups to allow communication between Jenkins, Nexus, and SonarQube.
- Install Plugins: Install necessary Jenkins plugins (Nexus, SonarQube, Git, Maven, etc.).
- Integrate Tools: Connect Jenkins with Nexus and SonarQube.
- Create Pipeline: Write and execute the pipeline script.
- Notifications: Set up automated notifications for build status.
Setting Up Nexus Repository
Nexus will be used as our artifact repository manager. We will run it on an Amazon Linux 2023 EC2 instance (t3.medium recommended).
Nexus Setup Script
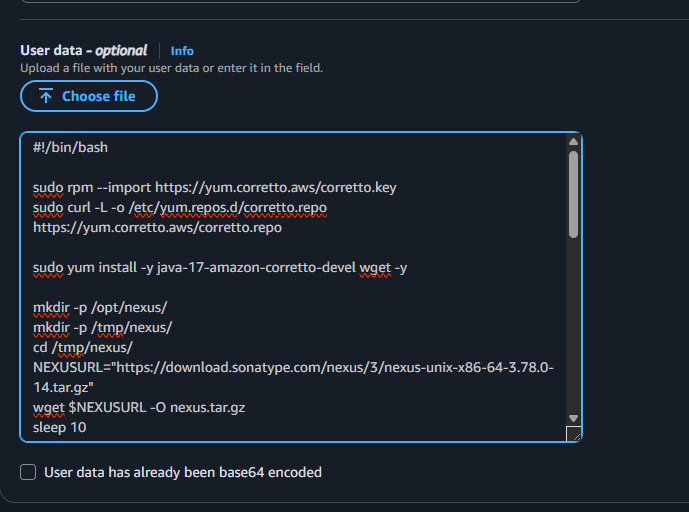
Use the following script in the EC2 user-data to automate the installation:
#!/bin/bash

# Import keys and repositories
sudo rpm --import https://yum.corretto.aws/corretto.key
sudo curl -L -o /etc/yum.repos.d/corretto.repo https://yum.corretto.aws/corretto.repo

# Install Java 17 (Required for Nexus)
sudo yum install -y java-17-amazon-corretto-devel wget -y

# Create directories
mkdir -p /opt/nexus/
mkdir -p /tmp/nexus/
cd /tmp/nexus/

# Download Nexus
NEXUSURL="https://download.sonatype.com/nexus/3/nexus-unix-x86-64-3.78.0-14.tar.gz"
wget $NEXUSURL -O nexus.tar.gz
sleep 10

# Extract Nexus
EXTOUT=`tar xzvf nexus.tar.gz`
NEXUSDIR=`echo $EXTOUT | cut -d '/' -f1`
sleep 5
rm -rf /tmp/nexus/nexus.tar.gz
cp -r /tmp/nexus/* /opt/nexus/
sleep 5

# Create Nexus user
useradd nexus
chown -R nexus.nexus /opt/nexus

# Create Systemd Service
cat <<EOT>> /etc/systemd/system/nexus.service
[Unit]
Description=nexus service
After=network.target

[Service]
Type=forking
LimitNOFILE=65536
ExecStart=/opt/nexus/$NEXUSDIR/bin/nexus start
ExecStop=/opt/nexus/$NEXUSDIR/bin/nexus stop
User=nexus
Restart=on-abort

[Install]
WantedBy=multi-user.target

EOT

# Configure run user
echo 'run_as_user="nexus"' > /opt/nexus/$NEXUSDIR/bin/nexus.rc

# Start Service
systemctl daemon-reload
systemctl start nexus
systemctl enable nexus
What this script does:
- Installs Java 17
- Downloads and extracts Nexus
- Creates a dedicated
nexususer - Configures Nexus as a system service to start on boot
Security Group for Nexus
- Allow Inbound Port 8081 from Jenkins EC2 and your IP address.
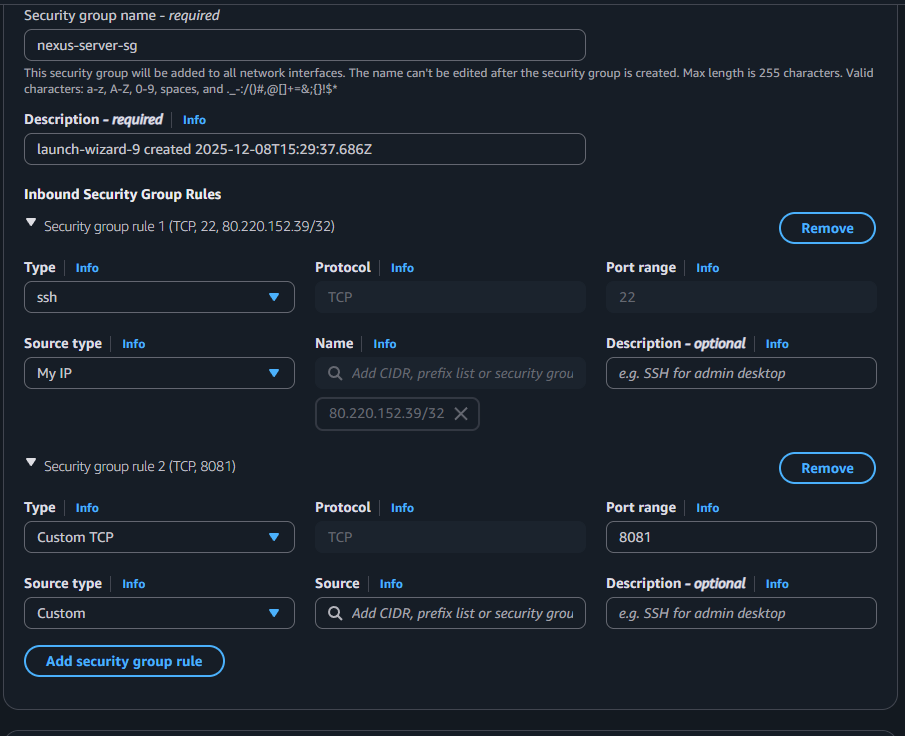
Paste the nexus script in user data and launch the instance.
Setting Up SonarQube Server
SonarQube will be used for code analysis. We will run it on an Ubuntu 24 EC2 instance (t3.medium recommended).
SonarQube Setup Script
Use the following script in the EC2 user-data:
#!/bin/bash

# System Configuration for SonarQube (Required for Elasticsearch)
cp /etc/sysctl.conf /root/sysctl.conf_backup
cat <<EOT> /etc/sysctl.conf
vm.max_map_count=262144
fs.file-max=65536
ulimit -n 65536
ulimit -u 4096
EOT

cp /etc/security/limits.conf /root/sec_limit.conf_backup
cat <<EOT> /etc/security/limits.conf
sonarqube   -   nofile   65536
sonarqube   -   nproc    409
EOT

# Install Java 17
sudo apt-get update -y
sudo apt-get install openjdk-17-jdk -y
sudo update-alternatives --config java

# Install PostgreSQL
sudo apt update
wget -q https://www.postgresql.org/media/keys/ACCC4CF8.asc -O - | sudo apt-key add -
sudo sh -c 'echo "deb http://apt.postgresql.org/pub/repos/apt/ `lsb_release -cs`-pgdg main" >> /etc/apt/sources.list.d/pgdg.list'
sudo apt install postgresql postgresql-contrib -y
sudo systemctl enable postgresql.service
sudo systemctl start postgresql.service

# Configure Database
sudo echo "postgres:admin123" | chpasswd
runuser -l postgres -c "createuser sonar"
sudo -i -u postgres psql -c "ALTER USER sonar WITH ENCRYPTED PASSWORD 'admin123';"
sudo -i -u postgres psql -c "CREATE DATABASE sonarqube OWNER sonar;"
sudo -i -u postgres psql -c "GRANT ALL PRIVILEGES ON DATABASE sonarqube to sonar;"
systemctl restart postgresql

# Install SonarQube
sudo mkdir -p /sonarqube/
cd /sonarqube/
sudo curl -O https://binaries.sonarsource.com/Distribution/sonarqube/sonarqube-9.9.8.100196.zip
sudo apt-get install zip -y
sudo unzip -o sonarqube-9.9.8.100196.zip -d /opt/
sudo mv /opt/sonarqube-9.9.8.100196/ /opt/sonarqube

# Create User and Permissions
sudo groupadd sonar
sudo useradd -c "SonarQube - User" -d /opt/sonarqube/ -g sonar sonar
sudo chown sonar:sonar /opt/sonarqube/ -R

# Configure SonarQube Properties
cp /opt/sonarqube/conf/sonar.properties /root/sonar.properties_backup
cat <<EOT> /opt/sonarqube/conf/sonar.properties
sonar.jdbc.username=sonar
sonar.jdbc.password=admin123
sonar.jdbc.url=jdbc:postgresql://localhost/sonarqube
sonar.web.host=0.0.0.0
sonar.web.port=9000
sonar.web.javaAdditionalOpts=-server
sonar.search.javaOpts=-Xmx512m -Xms512m -XX:+HeapDumpOnOutOfMemoryError
sonar.log.level=INFO
sonar.path.logs=logs
EOT

# Create Systemd Service
cat <<EOT> /etc/systemd/system/sonarqube.service
[Unit]
Description=SonarQube service
After=syslog.target network.target

[Service]
Type=forking
ExecStart=/opt/sonarqube/bin/linux-x86-64/sonar.sh start
ExecStop=/opt/sonarqube/bin/linux-x86-64/sonar.sh stop
User=sonar
Group=sonar
Restart=always
LimitNOFILE=65536
LimitNPROC=4096

[Install]
WantedBy=multi-user.target
EOT

systemctl daemon-reload
systemctl enable sonarqube.service

# Install and Configure Nginx (Reverse Proxy)
apt-get install nginx -y
rm -rf /etc/nginx/sites-enabled/default
rm -rf /etc/nginx/sites-available/default
cat <<EOT> /etc/nginx/sites-available/sonarqube
server{
    listen      80;
    server_name sonarqube.groophy.in;
    access_log  /var/log/nginx/sonar.access.log;
    error_log   /var/log/nginx/sonar.error.log;
    proxy_buffers 16 64k;
    proxy_buffer_size 128k;
    location / {
        proxy_pass  http://127.0.0.1:9000;
        proxy_next_upstream error timeout invalid_header http_500 http_502 http_503 http_504;
        proxy_redirect off;
        proxy_set_header    Host            \$host;
        proxy_set_header    X-Real-IP       \$remote_addr;
        proxy_set_header    X-Forwarded-For \$proxy_add_x_forwarded_for;
        proxy_set_header    X-Forwarded-Proto http;
    }
}
EOT
ln -s /etc/nginx/sites-available/sonarqube /etc/nginx/sites-enabled/sonarqube
systemctl enable nginx.service
sudo ufw allow 80,9000,9001/tcp

# Reboot to apply system changes
echo "System reboot in 30 sec"
sleep 30
reboot
What this script does:
- Configures system limits (required for SonarQube/Elasticsearch)
- Installs Java 17 and PostgreSQL
- Creates a database for SonarQube
- Installs SonarQube and configures it to use PostgreSQL
- Sets up Nginx as a reverse proxy (access on port 80)
Security Group for SonarQube
- Allow Inbound Port 80 from Jenkins EC2 and your IP address.
- Allow Inbound Port 9000 (if accessing directly without Nginx).
Verifying Installations
Verify Nexus
SSH into Nexus EC2:
ssh -i your-key.pem ec2-user@your-nexus-ip sudo systemctl status nexus- Access via browser:
http://your-nexus-ip:8081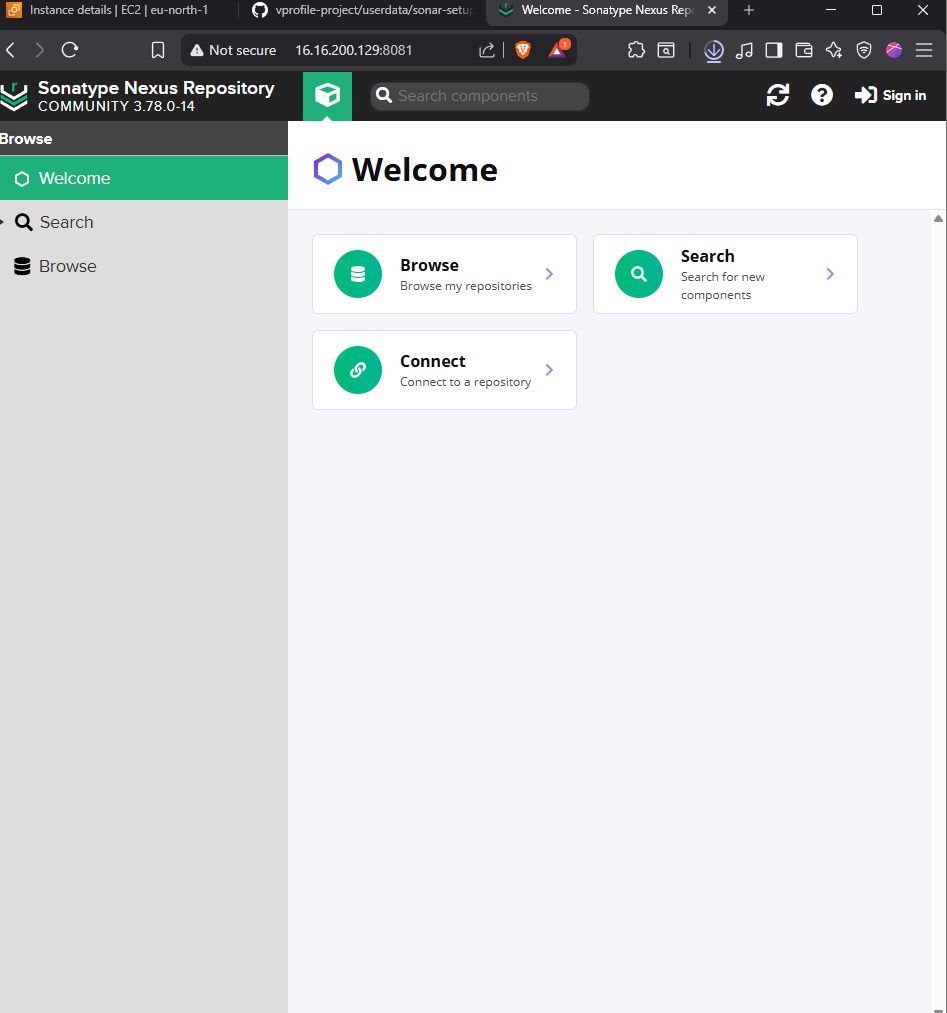
Get initial admin password:
cat /opt/nexus/sonatype-work/nexus3/admin.password- Login with
adminand the retrieved password.
Verify SonarQube
- Access via browser:
http://your-sonarqube-ip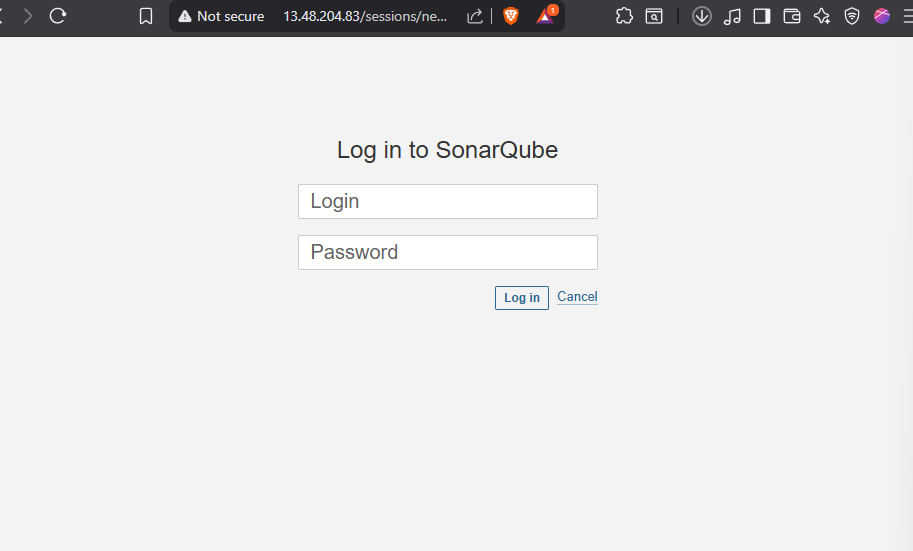
- Login with default credentials:
- Username:
admin - Password:
admin
- Username:
Jenkins Plugin Installation
To integrate these tools, install the following plugins in Jenkins:
- Nexus Artifact Uploader (for Nexus integration)
- SonarQube Scanner (for code analysis)
- Git Plugin (for source code management)
- Pipeline Maven Integration (for Maven builds)
- Build Timestamp (for versioning artifacts)
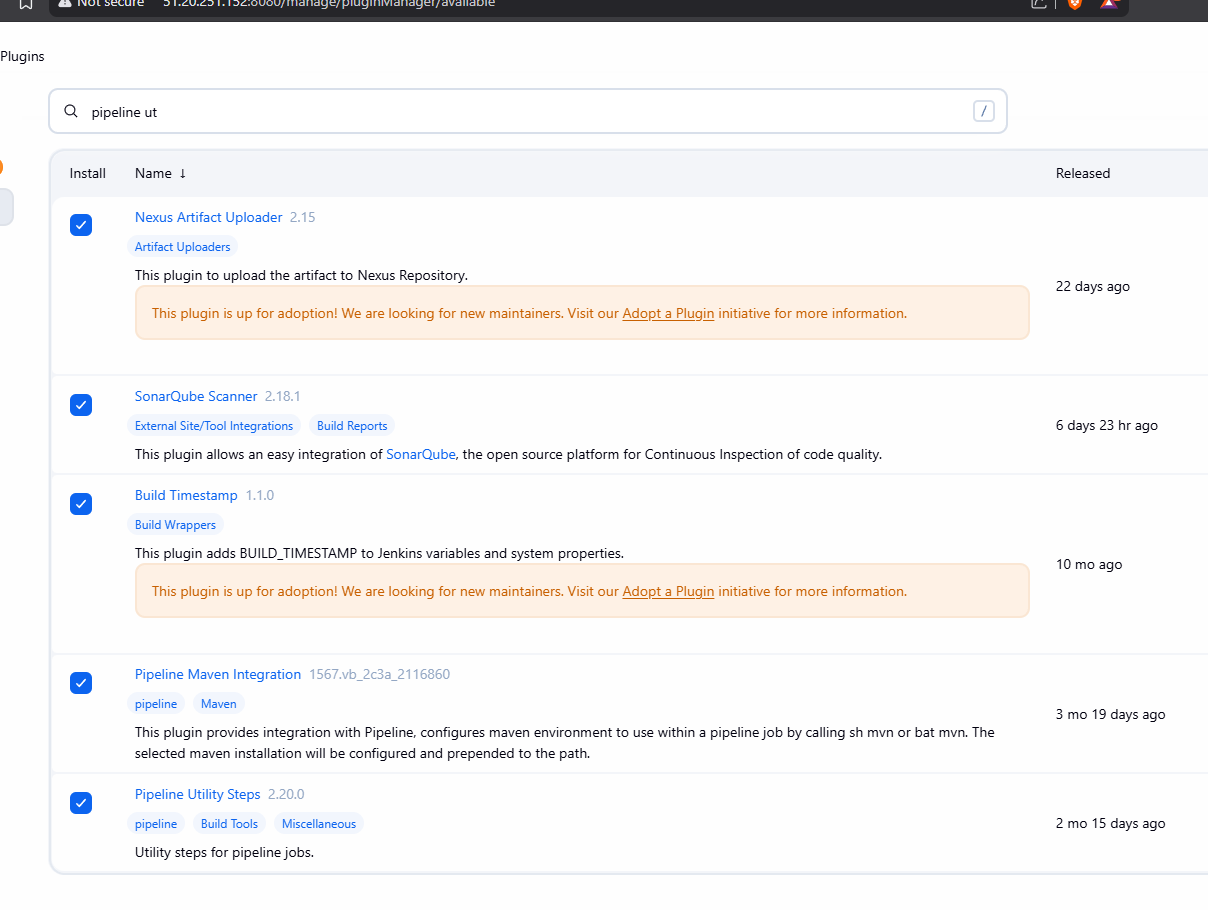
Go to Manage Jenkins > Plugins > Available Plugins and install them.