Jenkins Build Jobs and Artifact Management
Table of Contents
- Understanding Build Tools and Dependencies
- Configuring Jenkins Tools
- Creating Your First Job
- Creating a Build Job
- Versioning Artifacts
- Parameterized Builds
Understanding Build Tools and Dependencies
What Tools Does Your Project Need?
Before building a project, identify what tools are required. Let's use the vprofile-project as an example:
Required tools:
- Git (version control)
- Maven (build tool)
- Java JDK (runtime)
Plugin vs System Installation
Remember this important concept:
- Jenkins plugins provide the frontend interface
- System-level tools must be installed on the machine itself
When you need a build tool in Jenkins, you need both:
- A Jenkins plugin (frontend interface)
- The actual tool installed on the system (backend execution)
Configuring Jenkins Tools
View Installed Plugins and Tools
- Navigate to Manage Jenkins → Tools
- This shows all configured tools and plugins
Add Maven Installation
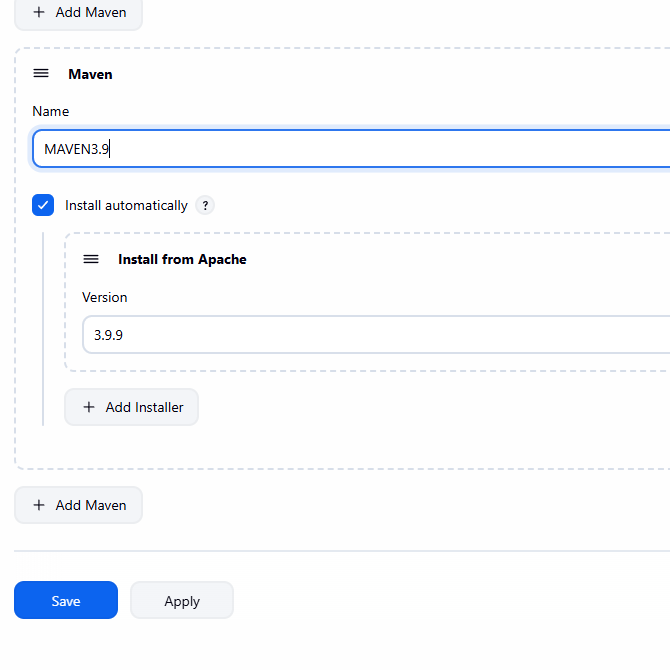 1. Go to **Manage Jenkins** → **Tools** 2. Find the Maven section 3. Click **Add Maven** 4. Configure Maven version (e.g., 3.9.9) 5. Jenkins can download and install automatically
Add JDK Installation
For Java, you have two options:
Option 1: Manual Installation (Recommended)
Install JDK on the system directly:
sudo apt install openjdk-17-jdk -yFind the
JAVA_HOMEpath:ls /usr/lib/jvmExample output:
java-1.17.0-openjdk-amd64
java-1.21.0-openjdk-amd64
java-17-openjdk-amd64
java-21-openjdk-amd64
openjdk-17
openjdk-21
Use path:
/usr/lib/jvm/java-17-openjdk-amd64- Add in Jenkins:
- Go to Manage Jenkins → Tools → JDK Installations
- Add the JAVA_HOME path manually
Option 2: Automatic Installation
- Jenkins can download and install JDK automatically (more complex setup)
Creating Your First Job
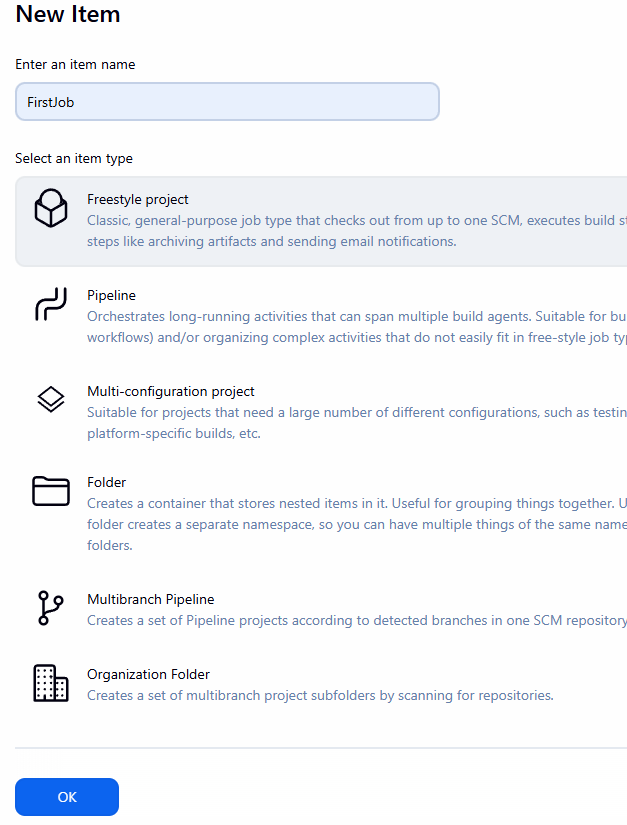
Step 1: Create a New Freestyle Job
- Click New Item on Jenkins dashboard
- Enter job name: "FirstJob"
- Select Freestyle project
- Click OK
Step 2: Configure Basic Settings
Description: Add a meaningful description
Build vprofile project from GitHub repo- Source Code Management: Git
- Repository URL:
https://github.com/your-repo/your-project.git - Branch:
*/main(or your default branch) - If the repo is public, no credentials needed
- Repository URL:
- Build Triggers: Leave empty for now (manual builds)
Build Step: Execute Shell
- Add commands to test:
whoami
pwd
w
id
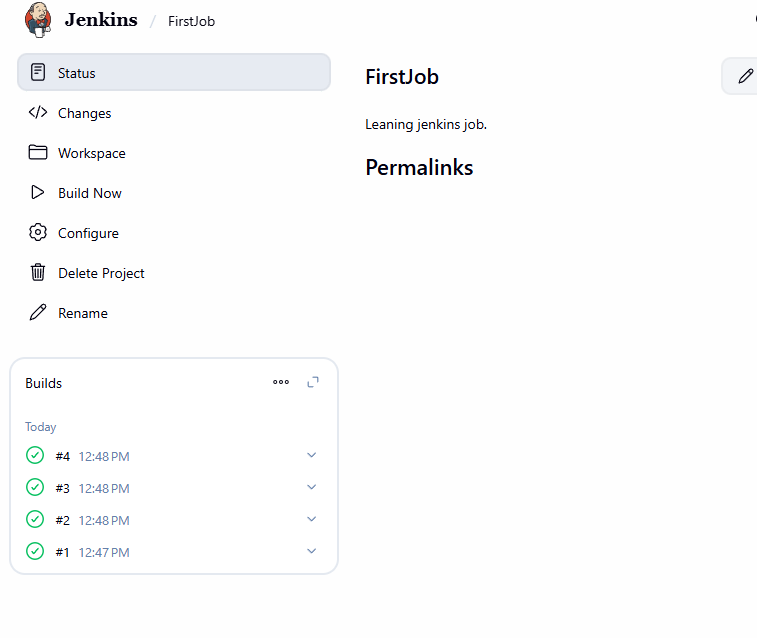
Step 3: Build and View Output
- Click Save
- Click Build Now multiple times
- Click on a build to see the console output
Example Output:
Started by user Duc Thai
Running as SYSTEM
Building in workspace /var/lib/jenkins/workspace/FirstJob
[FirstJob] $ /bin/sh -xe /tmp/jenkins8795589297149698121.sh
+ whoami
jenkins
+ pwd
/var/lib/jenkins/workspace/FirstJob
+ w
 12:48:22 up 47 min,  1 user,  load average: 0.03, 0.02, 0.00
USER     TTY      FROM             LOGIN@   IDLE   JCPU   PCPU  WHAT
ubuntu            80.220.152.39    12:01   44:00   0.00s  0.02s sshd: ubuntu [priv]
+ id
uid=111(jenkins) gid=113(jenkins) groups=113(jenkins)
Finished: SUCCESS
Step 4: Add Another Build Step
- Go back to Configure
- Add another build step: Execute Shell
Add command:
cat /proc/cpuinfo > cpuinfo.txt- Build again
- Check the workspace - you should see
cpuinfo.txtin/var/lib/jenkins/workspace/FirstJob/
Note: Jenkins runs as the jenkins user. Some commands may fail without proper permissions. For example:
sudo apt update # This will fail - jenkins user cannot use sudoCreating a Build Job
Project Overview
We'll create a job that:
- Fetches source code from GitHub
- Builds the project using Maven
- Archives the build artifact (WAR file)
Configuration Steps
Step 1: Create the Job
- New Item → Freestyle project
- Name: "Vprofile Build"
Step 2: Configure Source Code Management
- Repository URL:
https://github.com/vvduth/vprofile-project.git - Branch:
*/main(or your target branch) - No credentials needed for public repos
Step 3: Configure Build Step
- Add build step: Invoke top-level Maven targets
- Select Maven version: Maven 3.9.9 (or configured version)
- Goals and options:
install
Step 4: Archive Artifacts
- Post-build action: Archive the artifacts
- Files to archive:
**/*.war
Build and Verify
- Click Build Now
- View the build output
- Check the workspace for the generated WAR file
Versioning Artifacts
Problem: Overwriting Artifacts
When you build multiple times, the artifact gets overwritten. You lose previous builds.
Solution: Create Versioned Copies
Step 1: Create New Job
- Name: "Vprofile Build with Versioning"
- Copy configuration from "Vprofile Build"
Step 2: Add Versioning Step
- After Maven build step, add: Execute Shell
Add this command:
mkdir -p versions cp target/vprofile-v2.war versions/vpro$BUILD_ID.war$BUILD_IDis a Jenkins variable that increments with each build
Step 3: Build Multiple Times
- Click Build Now several times
- In the workspace, check the
versions/folder - You'll see files named:
vpro1.warvpro2.warvpro3.war- etc.
Each build creates a new versioned file!
Parameterized Builds
Problem: Hardcoded Values
In the previous approach, version names were fixed. What if you want to specify the version when building?
Solution: Parameterized Builds
Step 1: Create New Job
- Name: "Vprofile Build with Parameters"
- Copy configuration from "Vprofile Build"
Step 2: Enable Build Parameters
- Check: This project is parameterized
- Click Add Parameter → String Parameter
- Configure:
- Name:
VERSION - Default value:
v1.0.0 - Description:
Version number for the build artifact
- Name:
Step 3: Use Parameter in Build
- After Maven build step, add: Execute Shell
Add this command:
mkdir -p versions cp target/vprofile-v2.war versions/vprofile-$VERSION.war- The
$VERSIONvariable will be replaced with the parameter value
Step 4: Build with Parameters
- Click Build with Parameters (instead of "Build Now")
- Specify the version:
v2.0.0 - Click Build
- The artifact will be named:
vprofile-v2.0.0.war
Building Multiple Times:
- Build 1:
vprofile-v1.0.0.war - Build 2:
vprofile-v2.0.0.war - Build 3:
vprofile-v3.0.0.war
Summary
Key Concepts
- Jenkins needs both plugins and system tools for building
- Freestyle jobs are simple and graphical
- Build steps execute commands in sequence
- Artifacts can be archived for later use
- Versioning helps track multiple builds
- Parameterized builds allow flexibility during build time
Next Steps
- Explore Pipeline as Code for more complex workflows
- Integrate with version control webhooks for automatic builds
- Add testing and deployment stages
- Connect multiple jobs into a full CI/CD pipeline