![]()
Set Up Multiple Slots in a Lex Chatbot
Project Link: View Project
Author: Duc Thai
Email: ducthai060501@gmail.com
Build a Chatbot with Multiple Slots
Introducing Today's Project!
What is Amazon Lex?
Amazon Lex is a service from AWS that lets you build conversational interfaces—like chatbots—using voice and text. It uses advanced natural language processing and machine learning to understand what users say, manage multi-turn conversations, and respond intelligently.
It is useful because it makes it easy to create powerful, scalable, and secure chatbots without having to code complex NLP logic from scratch. With built-in integration to other AWS services, Lex helps automate tasks, collect information, answer questions, and connect users to real-world systems—all with natural language. This makes customer support, automation, and interactive experiences faster, smarter, and more accessible.
How I used Amazon Lex in this project
In today’s project, I used Amazon Lex to design and build an interactive banking chatbot called BankerBot. I created intents for welcoming users, checking account balances, transferring funds between accounts, and handling fallback situations with custom responses. I set up custom slot types to capture banking-specific details, added context carryover for a smoother conversation experience, and integrated Lambda functions to provide dynamic, real-time responses. By using Lex’s visual builder and conversation flow features, I made it simple to design and refine conversation paths, making the chatbot smarter and more user-friendly for typical banking scenarios.
One thing I didn't expect in this project was...
One thing I didn’t expect in this project was running into permissions issues when connecting Amazon Lex to my Lambda function after deploying with CloudFormation. Although I defined everything in the template, Lex required a specific resource-based policy that wasn’t automatically set up, which led to an “access denied” error. Troubleshooting and manually updating Lambda permissions was a surprise—but it taught me a lot about how AWS services interact behind the scenes!
This project took me...
This project took me 2 hours.
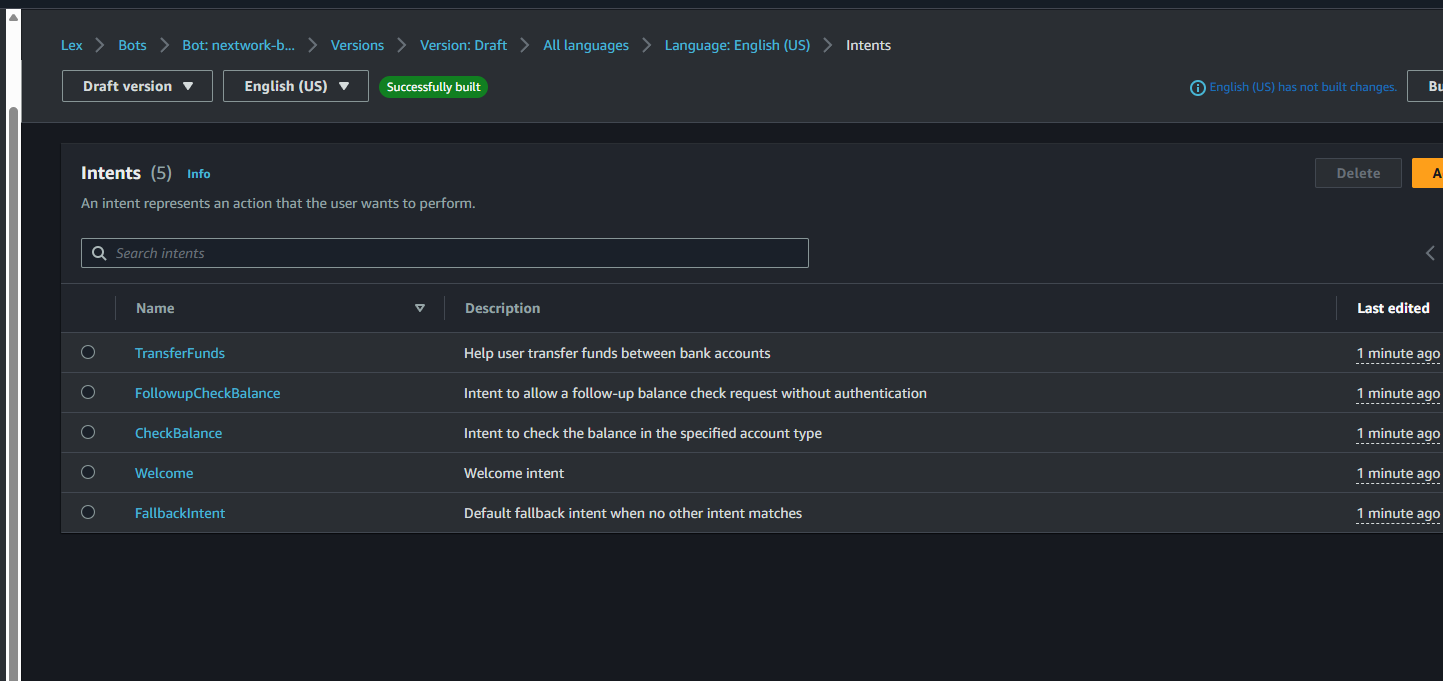
TransferFunds
Intent Name:
TransferFunds
Purpose:
Helps the user transfer funds between bank accounts using the chatbot.
Configuration:
- Sample Utterances:
- Can I make a transfer?
- I want to transfer funds
- I'd like to transfer {transferAmount} from {sourceAccountType} to {targetAccountType}
- Can I transfer {transferAmount} to my {targetAccountType}?
- Would you be able to help me with a transfer?
- Need to make a transfer
- Slots:
- sourceAccountType:
- Prompt: Which account would you like to transfer from?
- Slot type: accountType
- targetAccountType:
- Prompt: Which account are you transferring to?
- Slot type: accountType
- transferAmount:
- Prompt: How much money would you like to transfer?
- Slot type: AMAZON.Number
- sourceAccountType:
- Confirmation Panel: : explain later =)
Using multiple slots
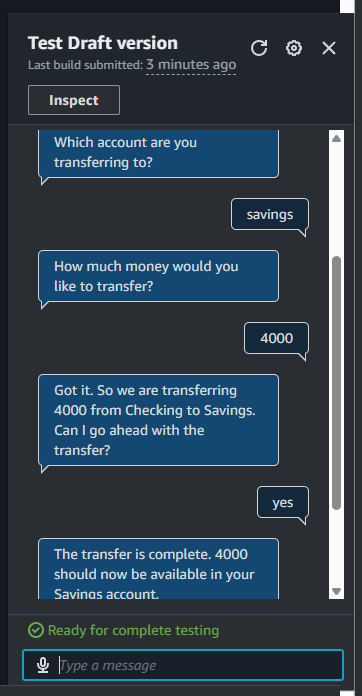
For this intent, I had to use the same slot type twice—accountType is used for both targetAccountType and sourceAccountType. This is because, when transferring money between accounts, the user needs to specify which account to send money from and which account to send it to. Using accountType for both slots makes it easy for the chatbot to recognize and prompt for any supported account, maintaining a consistent experience while making sure all the necessary details are collected for a successful transfer.
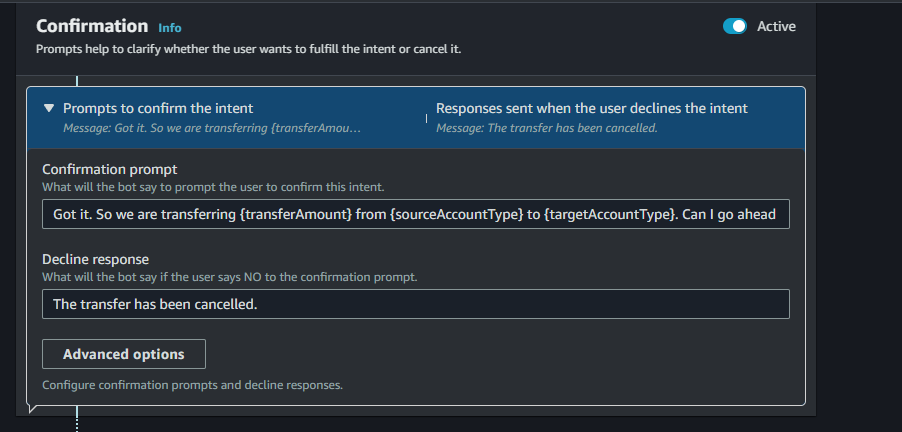
I also learnt how to create confirmation prompts, which are typically repeat back information for the user to confirm. e.g. "Are you sure you want to do x?" If the user confirms the intent, the bot fulfills the intent
If the user declines, then the bot responds with a decline response that you set up.
My Confirmation Panel:
- Confirmation prompt:
- Got it. So we are transferring {transferAmount} from {sourceAccountType} to {targetAccountType}. Can I go ahead with the transfer?
- Decline response:
- The transfer has been cancelled.
Exploring Lex features
The conversation flow feature in Lex gives you a visual, step-by-step overview of your bot’s interactions, showing each stage of a conversation in logical, chronological order. As you edit an intent, this flow updates in real time, helping you track how users move through the dialogue. You’ll also see "ghost" or blank responses—these are recommendations for extra bot responses or prompts you could add, and they're clickable for easy editing.
By clicking on a chat bubble, you can jump straight to the relevant edit screen to refine your setup. While we’re keeping our chatbot simple today and not adding extra conversation steps, this feature is extremely useful when designing more advanced chatbots, making it easier to visualize, adjust, and optimize the user experience.
You could also set up your intent using a visual builder! A visual builder in Amazon Lex lets you design and organize your chatbot’s conversation flow using a drag-and-drop, graphical interface. With the visual builder, you can:
- Easily add, edit, and arrange intents, slots, and responses without needing to manually write code.
- See how the conversation will flow visually, making it easier to spot gaps or issues.
- Connect different intents and set up transitions between them in a clear, interactive way.
- Quickly update prompts and responses by clicking on conversation elements.
This tool makes chatbot development much more intuitive, especially for mapping out complex interactions or troubleshooting your bot’s design.

AWS CloudFormation
AWS CloudFormation is a service that lets you automate the setup, deployment, and management of AWS resources using templates written in JSON or YAML. With CloudFormation, you can describe your entire infrastructure as code—including servers, databases, networking components, and permissions—making it easy to provision, update, and replicate environments reliably and efficiently. This approach helps you save time, reduce manual errors, and maintain consistency across different projects or teams.
I used CloudFormation to automate the deployment of my BankerBot chatbot environment. By writing a CloudFormation template, I was able to define all the resources I needed—like the Lex bot, the Lambda function for backend logic, and the log groups for monitoring—in one place using YAML. This allowed me to quickly tear down and redeploy my bot setup in seconds, ensuring everything was consistently configured and saving me time compared to manual setup. Plus, if any errors appeared during deployment, I could easily track them and make fixes directly in the template before redeploying.
The final result!
Re-building my bot with CloudFormation took me 10 mins.
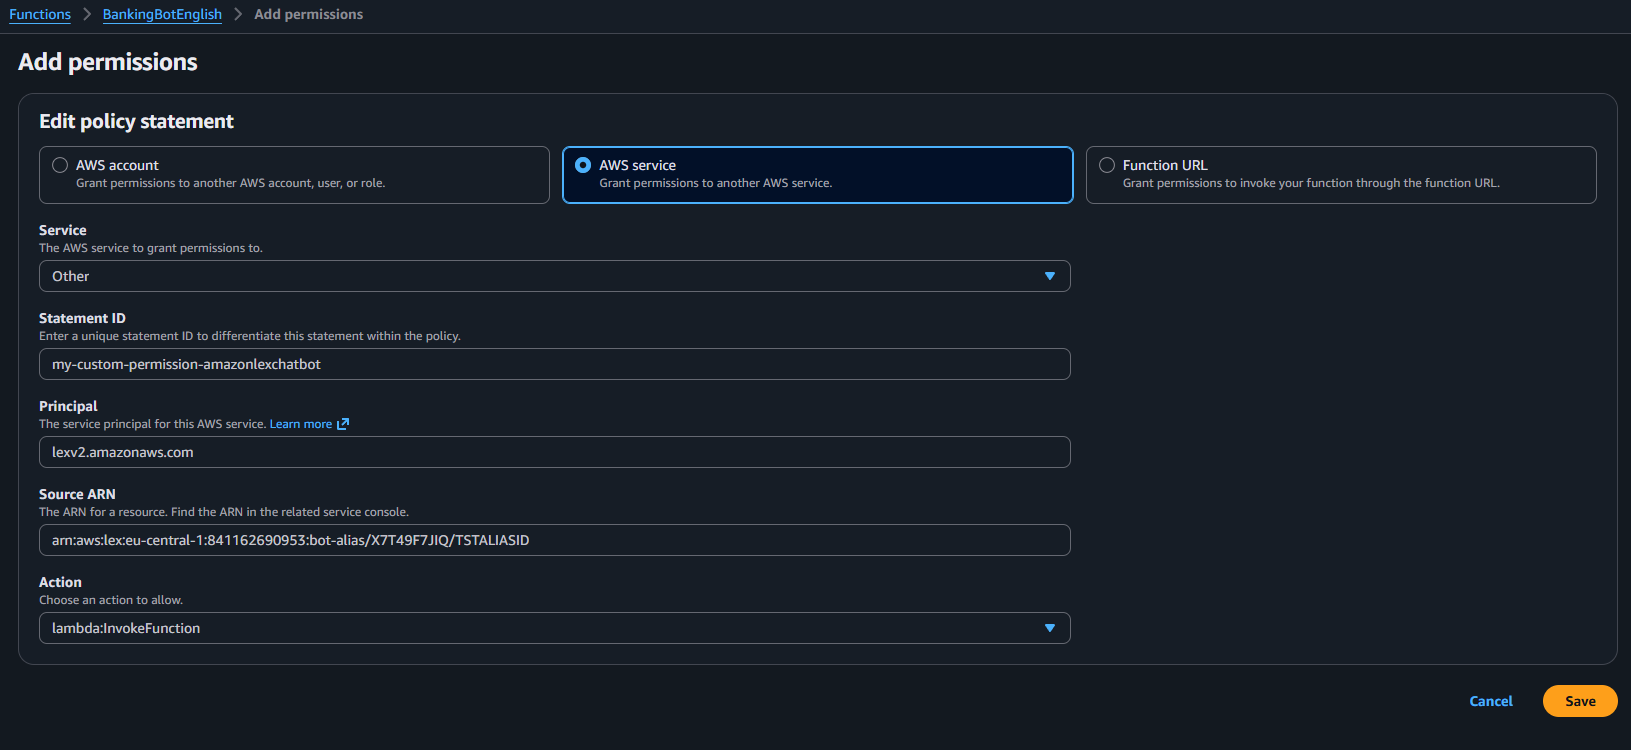
Here’s why I had to troubleshoot after deploying my bot:
After deployment, I received an error: “Invalid bot config: access denied while invoking Lambda function.” This happened because the AWS Lambda function didn’t have the correct permissions, so it couldn’t pass data back to my chatbot.
Why was there an error?
- The Lambda function’s permissions were not set up correctly via CloudFormation.
- Lex needed explicit permission to invoke the Lambda, but the resource-based policy was missing or misconfigured.
How did I fix it?
- Created and deployed a new Lambda function called
BankingBotEnglish, using Python 3.12 (or later). - Added the same code from my CloudFormation template to this new function.
- Redirected my Lex Version 1 Alias to use the new Lambda function.
- Adjusted permissions:
- Navigated to the Permissions tab in Lambda.
- Added a new resource-based policy statement to grant Lex access:
Using the visual builder
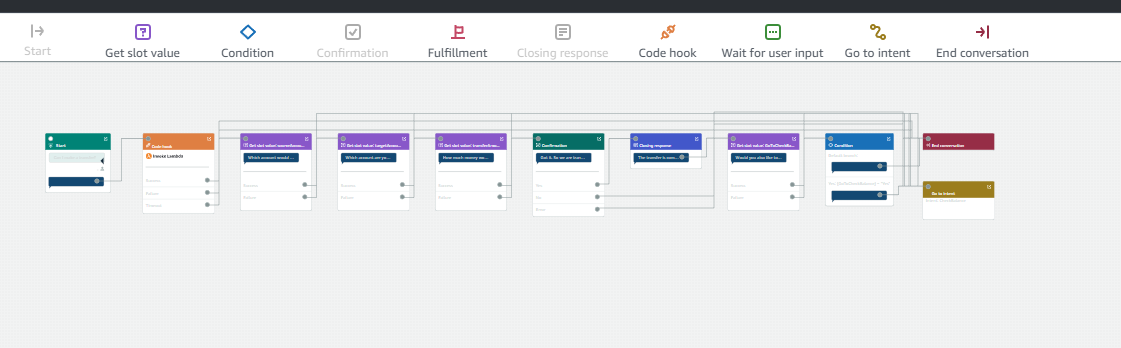
Using the visual builder, I added a new conversation flow that guides users through transferring money between accounts and then smoothly offers them the option to check their account balance. This setup includes cards for getting slot values, handling success and failure outcomes, adding conditions, and switching intents based on user responses.
What this means for an end user is:
- The chatbot now gives a more seamless experience. After a transfer is complete, the bot can immediately help users check another balance without starting the process from scratch.
- The conversation feels natural and responsive, with smart branching—if users want to do something else (like check a balance), the bot takes them there automatically.
- If something doesn’t go as planned (for example, if the bot can’t figure out the user’s next request), it handles it gracefully by providing a helpful fallback response.
- Trigger Point:
The card activates right after the "The transfer is complete" message in your Closing response card finishes. You connect it by dragging the arrow from this message to the Get slot value card. - Functionality:
This card checks whether the user wants to check their account balance next. It attempts to capture a slot value related to the user’s intention. - Success Path:
If the slot is successfully captured (the user does want to check their balance), you drag an arrow from the Success outcome of the Get slot value card to the Condition card. This sets up the logic for what happens next. - Failure Path:
If the slot capture fails (the user doesn’t confirm or you can’t determine their intent), you connect the Failure outcome to the FallbackIntent. This ensures the conversation doesn’t break and the bot still responds helpfully.