![]()
Chat With Your Bot in the Terminal
Project Link: View Project
Author: Duc Thai
Email: ducthai060501@gmail.com
Interacting With My RAG Chatbot in the Terminal

Introducing Today's Project!
In this project, I will learn use a RAG (Retrieval Augmented Generation) chatbot directly from the terminal!
Whether you’re coding, debugging, or need quick information from your documents, your AI-powered chatbot will be available in your terminal, ready to answer questions instantly.
💡 Why chat with your chatbot over the command line?
While running commands might seem intimidating at first, many DevOps and Backend engineers prefer the command line interface (CLI) over a web app or console. Here’s why:
- Speed: You can run commands much faster than clicking through a web app.
- Automation: You can script commands to automate repetitive tasks.
- Control: You get more fine-grained control over what you’re doing when using the CLI.
Interacting with Bedrock over the command line is not only faster but also provides me with more configuration and customization options.
I’m doing this project to learn how to integrate AI and nd command line tools.
Tools and concepts
The services I used were Amazon S3 (for storing documents), Amazon Bedrock (for managing the Knowledge Base and AI models), Amazon OpenSearch Serverless (for storing embeddings), and AWS IAM (for secure access).
The key concepts I learnt included Retrieval Augmented Generation (RAG) for smarter chatbot answers, chunking and embeddings to make documents searchable, vector storage for rapid similarity search, and prompt engineering to guide chatbot behavior. I also deepened my understanding of AWS service integration and role-based access control for AI workflows.
Project reflection
This project took me approximately two weeks to complete.
The most challenging part was setting up the Knowledge Base and configuring chunking, embeddings, and vector storage so all AWS services worked seamlessly together.
It was most rewarding to see my custom AI chatbot accurately retrieve and generate responses from my own documents, proving the RAG workflow in Amazon Bedrock worked as intended.
I chose to do this project today because I wanted to strengthen my practical skills in AWS and AI, get hands-on experience integrating cloud services, and see how they work together to build a real-world solution. Tackling this project now helps me apply what I’ve learned, challenge myself with new tasks, and create something useful that showcases my technical growth.
Setting Up The Knowledge Base
In an S3 bucket, I uploaded 10 PDF files—these are the documents from my 10 previous projects about AI and AWS. My S3 bucket is in the same region as my Knowledge Base (Ohio, us-east-2) because keeping them in the same AWS region reduces latency, lowers data transfer costs, and ensures smooth, reliable integration between the storage and the Knowledge Base features. This setup allows my RAG-powered chatbot to quickly access and retrieve information from my project documents whenever needed.
I also created a Knowledge Base in Bedrock to acts like my chatbot’s personal library, storing all the information and documents it needs to answer questions accurately.
Even though I already connected my S3 bucket when creating the Knowledge Base, I still need to sync because simply pointing the Knowledge Base to my S3 bucket doesn’t automatically load the documents into the system. Syncing is necessary to ingest, process, and index the files—this includes chunking the documents, creating embeddings, and storing them in the vector database (OpenSearch). Without syncing, the chatbot can’t access or search my documents, so the Knowledge Base would remain empty and unable to answer questions using my data. Syncing makes sure all my latest files are available, up-to-date, and ready for AI-powered retrieval and generation.

Running CLI Commands in CloudShell
AWS CLI (Command Line Interface) is a powerful tool that lets you interact with AWS services directly from your terminal by running commands. With AWS CLI, you can automate tasks, configure resources, manage data, and control your cloud environment efficiently using scripts or manual commands—no need for the web console.
CloudShell is a browser-based shell provided by AWS that you can access from the AWS Management Console. It comes pre-configured with AWS CLI and other tools, allowing you to run terminal commands against your AWS account without any local setup. To start testing CLI commands, I first opened CloudShell, which instantly gave me a ready-to-use terminal with all the necessary permissions and tools to work on my AWS projects.
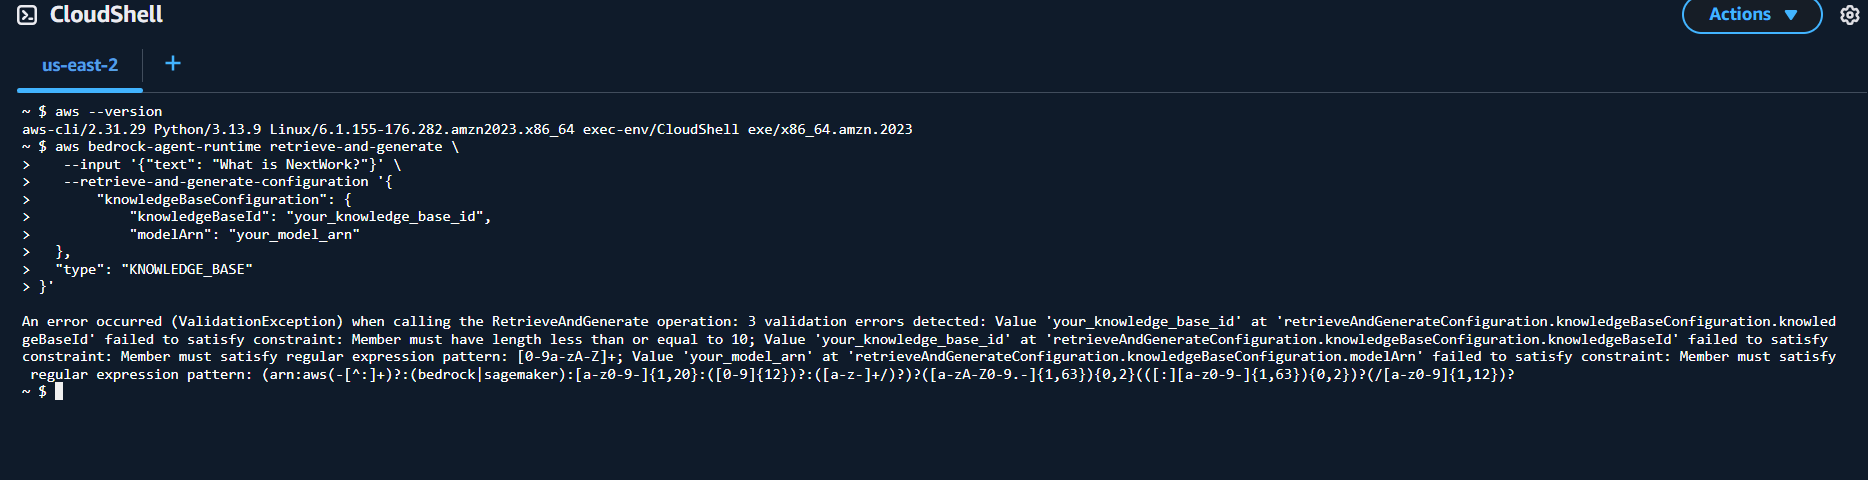
When I first ran a Bedrock command like this:
aws bedrock-agent-runtime retrieve-and-generate \
  --input '{"text": "What is NextWork?"}' \
  --retrieve-and-generate-configuration '{
    "knowledgeBaseConfiguration": {
      "knowledgeBaseId": "your_knowledge_base_id",
      "modelArn": "your_model_arn"
    },
    "type": "KNOWLEDGE_BASE"
  }'
I got an error because I needed to provide actual values for your_knowledge_base_id and your_model_arn.
These are required to identify which Knowledge Base should be queried and which AI model should generate the response.
- knowledgeBaseId: The specific ID of the Knowledge Base you created in Amazon Bedrock.
- modelArn: The full Amazon Resource Name of the generative AI model you selected (e.g., Llama, Titan, etc.).
Without real values for these fields, the command can’t connect to your resources and will fail. I need to copy these values from my Bedrock dashboard or resource setup and replace the placehold.
While finding the parameters takes extra time, the advantage of using the CLI is that it provides faster, more efficient control over AWS resources. The CLI lets you automate repetitive tasks, script complex workflows, and quickly execute commands without navigating through the web console. With the CLI, you gain more flexibility and precision, making it easier to manage infrastructure, troubleshoot problems, and customize your environment to suit your needs. It’s especially useful for developers and engineers who want speed, automation, and full control over cloud operations.
Running Bedrock Commands
To find the required values for my Bedrock command, I had to:
Look up the AWS user guide on how to obtain the modelArn for my selected Bedrock model. I discovered the useful command:
aws bedrock get-foundation-model --model-identifier <your-model-id>Next, I needed the correct model-id. I could find this by running:
aws bedrock get-foundation-model --model-identifier meta.llama3-3-70b-instruct-v1:0Alternatively, I could go to the Bedrock Console, select the model from the Models section, and copy its ID.
Once I had both the Knowledge Base ID and the modelArn, I updated my Bedrock command and ran it.
Result:
The Bedrock command ran successfully and returned:
{
  "sessionId": "....",
  "output": {
    "text": "NextWork is an organization that provides projects and resources for learning and development, with the goal of helping everyone find a job they love."
  },
  "citations": [...]
}
This success.
The retrieve-and-generate command typically also outputs raw information that's used to generate the response, it might get a bit messy in my terminal if i am running lots of commands. To tidy up the terminal response, I added --query 'output.text'.
When I added the --query 'output.text' parameter to the retrieve-and-generate command, the terminal response became much cleaner. Instead of displaying all the raw JSON data—including session IDs, citations, and other details—I only saw the actual answer text generated by the chatbot. This made it much easier to read and manage outputs, especially when running lots of commands in the terminal. Using the --query option helps tidy up the response, focusing only on the information I want.
Extending Your Knowledge Base
When I first tested my Knowledge Base by asking it a question it doesn’t know ("Why did the coffee go to the police?"), I noticed that the chatbot replied saying it didn’t know the answer or couldn’t help with the request. This showed me that the Knowledge Base is working as intended—limiting responses to only what’s included in my uploaded documents, and not attempting to make up answers about topics outside my data.
To add new information to my Knowledge Base, I followed these steps:
Create a new file in CloudShell with the information:
echo "Why did the coffee go to the police? Because it got mugged!" > secret-mission.txtUpload the file to my S3 bucket:
aws s3 cp secret-mission.txt s3://nextwork-rag-bedrock-dukem/secret-mission.txtStart an ingestion job to sync the new data into my Knowledge Base:
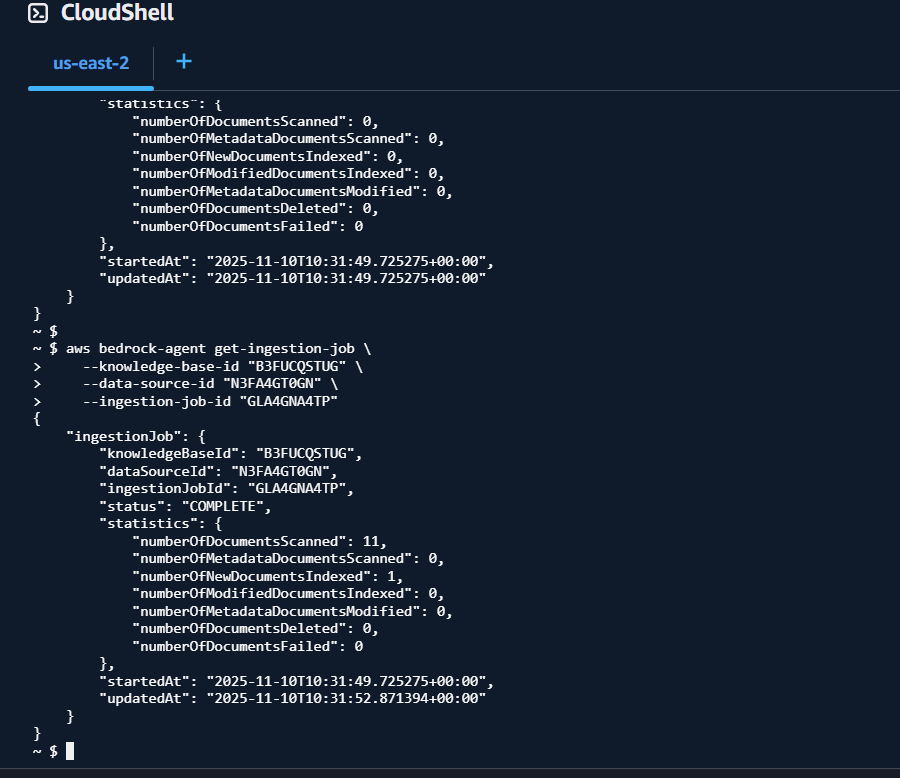
aws bedrock-agent start-ingestion-job \
    --knowledge-base-id "knowledge_base_id" \
    --data-source-id "data_source_id"
Compared to using the AWS Console, this process was faster and more efficient. I could automate everything with just a few commands, skip the manual upload steps, and immediately run an ingestion job without navigating through any web pages. Using CloudShell and CLI made knowledge updates quick and scriptable for future changes.
To verify my Knowledge Base update, I re-ran the query, "Why did the coffee go to the police?"
This time, the Knowledge Base successfully answered, "Because it got mugged!"
This validated that the new information was properly ingested and available for my chatbot to retrieve and respond with, confirming my update worked as intended.
Interacting with AI Models Directly
I interacted directly with an AI model via the terminal by running this command:
aws bedrock-runtime invoke-model \
    --model-id meta.llama3-3-70b-instruct-v1:0 \
    --body '{"prompt": "Write a short poem about cats"}' \
    --cli-binary-format raw-in-base64-out \
    --region us-east-2 \
    --output text \
    /dev/stdout
This command connects straight to the Llama 3.1 8B Instruct model on Bedrock and sends a prompt for immediate AI processing. Instead of going through my chatbot or RAG workflow, I interacted with the model itself—letting me test prompts, generate text, and explore what the model can do right from my terminal. This makes it easy to experiment, try out creative ideas, or troubleshoot issues directly with the AI using just command-line tools.
