![]()
Deploy Backend with Kubernetes
Project Link: View Project
Author: Duc Thai
Email: ducthai060501@gmail.com
Deploy Backend with Kubernetes
Introducing Today's Project!
In this project, I am here to learn about kubectl by deploying my backend application on a Kubernetes cluster and tracking my Kubernetes deployment using Amazon EKS. This builds on what I learned in previous projects—setting up an EKS cluster, which is a managed group of containers orchestrated by Elastic Kubernetes Service (EKS).
The key steps are:
- Build a container image: Package my backend code into a Docker image that Kubernetes can run.
- Deploy the image on Kubernetes: Use
kubectlto interact with the cluster and launch my app. - Set up manifest files: Write Kubernetes manifest files that provide instructions for EKS on how to deploy, manage, and expose my containerized backend.
By working through these steps, I will gain practical experience with deploying, managing, and tracking cloud-native applications using Kubernetes and EKS.
Tools and concepts
I used Kubernetes, Amazon ECR, and kubectl to deploy and manage my backend application in the cloud.
Key concepts include:
- Using manifests: Manifests are YAML files that describe how Kubernetes should deploy, configure, and expose my app.
- Containerization: Packaging my backend code into a Docker image so it runs consistently anywhere.
- Amazon ECR: Storing and retrieving container images securely.
- kubectl: The command-line tool for interacting with Kubernetes resources—deploying manifests, checking pod status, and troubleshooting.
- Kubernetes deployments and services: Managing replicas, rollout updates, and exposing the app for internal/external access.
- Infrastructure as code: Automating the setup and management of my application using code instead of manual configuration.
Together, these tools and concepts gave me a practical workflow for deploying cloud-native applications and taught me how manifests control the entire deployment process.
Project reflection
This project took me approximately 2 hours to complete. The most challenging part was troubleshooting deployment issues with the Kubernetes manifests and making sure my backend application was properly exposed and accessible through the Service. My favourite part was seeing everything come together—successfully deploying my backend app on EKS and being able to monitor it in the AWS console. It was rewarding to watch my application running in the cloud after all the setup!
Project Set Up
Kubernetes cluster
To set up today's project, I launched a Kubernetes cluster. The cluster's role in this deployment is like a command center: it tells my EC2 instances (called “nodes”) when to start, stop, or scale my containers and keeps them connected to the internet. It keeps my app's deployment running smoothly while I focus on writing code.
Backend code
Next, I retrieved the backend that I plan to deploy. The backend is the "brain" of an application—it processes user requests, stores and retrieves data, and handles the business logic behind the scenes. Unlike frontend code, which users see and interact with, backend code runs on the server side to ensure the app functions correctly when users interact with it (like loading a new page or submitting a form).
I retrieved the backend code by using the git clone command, which downloads the entire project repository from GitHub to my EC2 instance. This gives me all the source files I need to build, package, and eventually deploy the backend service to my Kubernetes cluster.
Container image
Once I cloned the backend code, my next step is to build a container image of the backend. This is because Kubernetes deploys applications using container images, which package the app code, dependencies, and environment into a portable format. By building a container image, I make sure my backend app can run consistently on any Kubernetes node, and it can be easily distributed, managed, and scaled across the cluster. This step prepares my application for cloud-native deployment and automation.
I'm using Amazon ECR in this project to store and manage the container image of my backend application. ECR is a good choice for the job because it’s a fully managed, secure, and scalable container registry service provided by AWS. It integrates seamlessly with other AWS services like EKS (Kubernetes), making it easy for my cluster to pull images for deployment. ECR also supports access control, automation, and fast image retrieval, which helps streamline my workflow and ensures my images are reliably available for my deployments.
Manifest files
Kubernetes manifests are like a set of instructions that tell Kubernetes how to run my app. They specify what my app needs—such as which containers to run, how many replicas to create, what resources to allocate, and how to expose the service. Manifests are written in YAML or JSON, and Kubernetes uses them to automate the setup and management of applications.
Manifests are helpful because they make deployment simple, clear, and consistent. Without manifests, Kubernetes wouldn’t know how to set up and manage my app automatically. I’d have to manually configure each container every time I deploy, which would be confusing, error-prone, and hard to repeat. With manifests, I can reliably deploy, update, and scale my app with ease.
Tip: In general (even outside of Kubernetes), a manifest is an instruction manual that tells a system how to set up and manage something.
A Kubernetes deployment manages the rollout and lifecycle of application instances in your cluster. It automatically creates, updates, and maintains the desired number of replicas of your app, ensuring high availability and easy scaling. The deployment also handles updating your app safely, rolling back if something goes wrong, and helps keep your app running even if individual pods fail.
The container image URL in my Deployment manifest tells Kubernetes exactly which version of my app to run and where to pull the image from (like Amazon ECR). Kubernetes uses this URL to fetch the container image, create pods, and keep the application up and running in the cluster.
A Kubernetes Service exposes your application running inside the cluster so that other services, users, or external systems can access it. It acts as a stable endpoint that routes traffic to the correct pods, even if their IP addresses change.
You need a Service manifest to define how Kubernetes should expose your backend app—whether it’s just inside the cluster, or to the outside world through a load balancer or NodePort. Without a Service, your app would be isolated and unreachable, making it impossible for users or other applications to connect to it.

Backend Deployment!
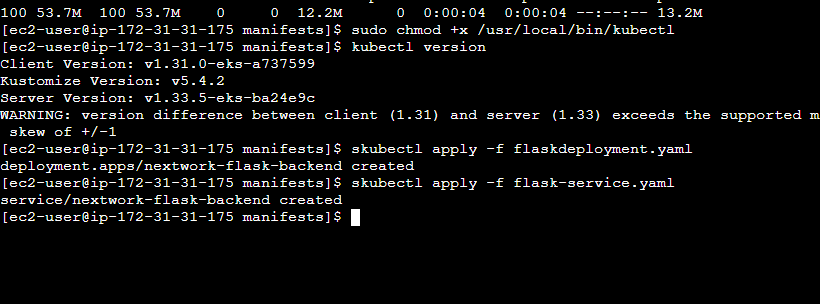
To deploy my backend application, I first installed kubectl on my EC2 instance. I then gave my EC2 instance permission to run kubectl without needing sudo by running sudo chmod +x /usr/local/bin/kubectl. After setting up the permissions, I applied my Kubernetes manifests using the following commands:
kubectl apply -f flask-deployment.yaml
kubectl apply -f flask-service.yaml
This created my deployment and service resources in the cluster, which launched my backend application and exposed it so users could access it.
kubectl
kubectl is the command-line tool for interacting with Kubernetes resources (like Deployment or Service resources) once my cluster is up and running. I am using it to apply my manifests and deploy my application to the Kubernetes cluster. I need this tool to create, update, inspect, and manage resources such as pods, deployments, and services in Kubernetes.
I can't use eksctl for this job because eksctl is only for setting up and deleting your EKS cluster and configuring its settings. Once the cluster is created, kubectl is the tool I use to manage what runs inside the cluster—deploying apps, scaling workloads, and troubleshooting issues.
Verifying Deployment
My extension for this project is to use the Amazon EKS console to visually monitor and manage my Kubernetes cluster and deployments. The EKS console makes it easier to check the health and status of my backend app, view logs, and troubleshoot issues without always needing to use the command line.
I had to set up IAM access policies because AWS permissions alone don’t automatically carry over to Kubernetes—Kubernetes has its own way of managing access within a cluster. Even if I have AdministratorAccess in AWS, Kubernetes will only let me access different parts of the cluster if I have permissions set up under its own system.
To set up access, I used the terminal to run:
eksctl create iamidentitymapping --cluster nextwork-eks-cluster --arn arn:aws:iam::841162690953:user/dukem-IAM-admin --group system:masters --username admin --region eu-north-1You can also do this from the AWS console in IAM by creating the appropriate access entry.
Pods are the smallest deployable units in Kubernetes. Each pod can contain one or more containers, which share the same network space and storage on the node they run on. This shared environment allows the containers within a pod to communicate and share data more efficiently.
When I gained access to my cluster's nodes, I discovered pods running inside each node with names like nextwork-flask-backend-89d5bd9f4-lt4fc, aws-node-97wct, kube-proxy-tm7ng, and metrics-server-5786d9869c-4x2l5. These pods represent different components and workloads inside my cluster. For example, application pods like nextwork-flask-backend-... run my backend app, while system pods like aws-node and kube-proxy help manage cluster networking.
By grouping containers together in pods, Kubernetes makes it easier to manage, scale, and keep my application components working reliably.
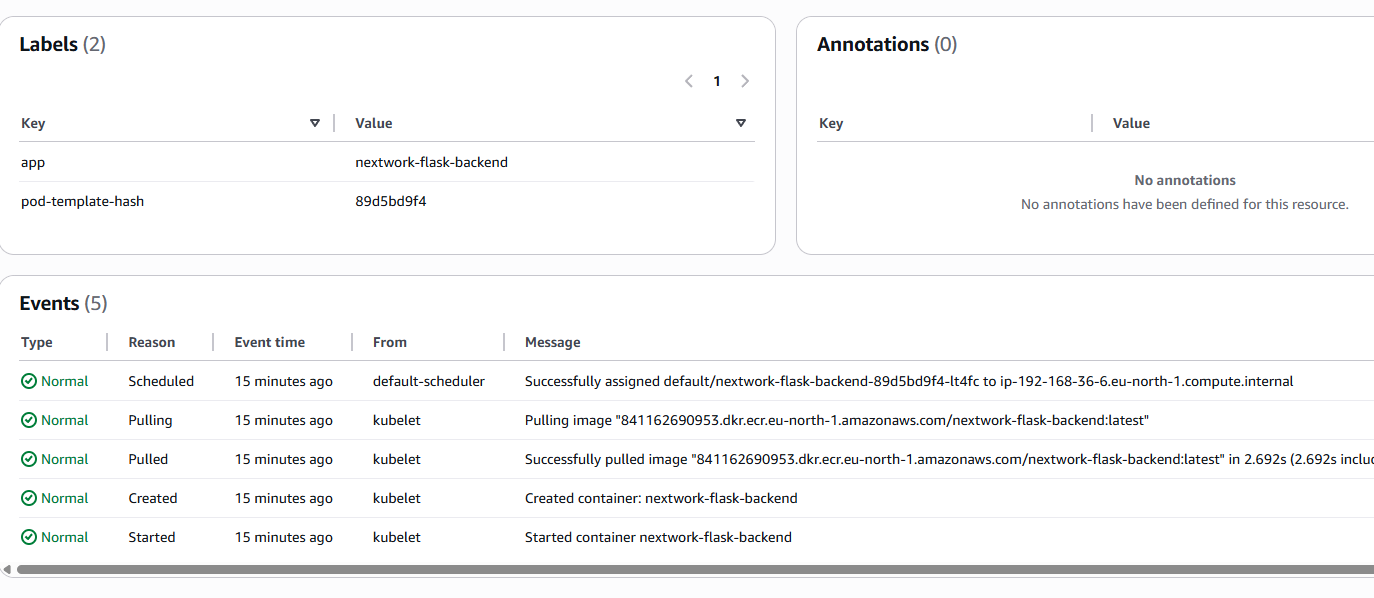
The EKS console shows you the events for each pod, where I could see a detailed timeline of actions for my backend pod. For example, in the Events tab , I saw:
- The pod was successfully scheduled to a node.
- Kubernetes started pulling my container image from ECR.
- The image was pulled successfully.
- The container was created.
- The container was started.
This validated that my deployment was working as expected: the pod was assigned to a node, the backend image was retrieved from ECR without errors, and the container started up successfully. These event messages confirm that my application is running and that all steps in the deployment process completed without issues.