![]()
Create Kubernetes Manifests
Project Link: View Project
Author: Duc Thai
Email: ducthai060501@gmail.com
Create Kubernetes Manifests
Introducing Today's Project!
In this project, I will learn about Kubernetes manifests and how to use them to tell Kubernetes how to deploy and manage my containerized backend application. I have already created an EKS cluster in previous projects, cloned my backend code from GitHub, built a Docker image, and pushed it to AWS ECR. Now, the next steps are:
🛫 Set up a Deployment manifest to tell Kubernetes how to deploy my backend app—this includes specifying details like which container image to use, how many replicas to run, and how to keep my app running reliably.
🚚 Set up a Service manifest to tell Kubernetes how to expose my backend to users—this defines how traffic can reach my app from outside the cluster, such as through a load balancer or a NodePort.
These manifests are essential for automating and managing the deployment and access to my backend application in Kubernetes.
Tools and concepts
I used Amazon EKS, eksctl, Docker, Amazon ECR, and Git to deploy my backend application to Kubernetes in the cloud.
Key concepts include:
- Using manifests to define and automate how Kubernetes deploys and manages containerized applications.
- Containerization (with Docker) to package my app and its dependencies for consistent deployment.
- ECR as a container registry to store and share Docker images securely.
- Kubernetes deployments and services to manage replicas, updates, and expose my app to users.
- Infrastructure as code—using YAML manifests to describe resources, making deployment reproducible and maintainable.
These tools and concepts together gave me a practical workflow for cloud-native app deployment and taught me how to use Kubernetes manifests to control every aspect of my backend in the cluster.
Project reflection
I chose to do this project today because I wanted to deepen my hands-on experience with deploying containerized applications using Kubernetes on AWS. Having already set up the foundational components in previous projects, today felt like the perfect opportunity to build on that knowledge and tackle the practical steps of using manifests to automate deployment and manage my backend app. By working through this project, I’m strengthening my skills in cloud-native infrastructure, and preparing myself for real-world DevOps scenarios.
This project took me approximately 2 hours to complete. The most challenging part was troubleshooting configuration issues with Kubernetes manifests and making sure my backend app was correctly exposed through the Service. My favourite part was seeing my backend application running successfully in the EKS cluster and being able to access it through the Kubernetes Service, which made all the setup and effort rewarding!
Project Set Up
Kubernetes cluster
To set up today’s project, I launched a Kubernetes cluster on AWS. The steps I took included:
- Granting my EC2 instance AdministratorAccess permissions by assigning it the appropriate IAM role. This ensured my EC2 instance could create and manage AWS resources necessary for the cluster.
- Installing eksctl on my EC2 instance. eksctl is a command-line tool that simplifies the process of creating and managing EKS clusters.
- Running the eksctl create cluster command:
eksctl create cluster \
  --name nextwork-eks-cluster \
  --nodegroup-name nextwork-nodegroup \
  --node-type t3.micro \
  --nodes 3 \
  --nodes-min 1 \
  --nodes-max 3 \
  --version 1.33 \
  --region eu-north-1
This command created a new EKS cluster named nextwork-eks-cluster, set up a node group of t3.micro EC2 instances, specified the desired, minimum, and maximum number of nodes, set the Kubernetes version, and chose the AWS region.
These steps gave me a working Kubernetes cluster.
Backend code
Next, I retrieved the backend that I plan to deploy. The backend is the "brain" of an application—it processes user requests, stores and retrieves data, and handles the business logic behind the scenes. Unlike frontend code, which users see and interact with, backend code runs on the server side to ensure the app functions correctly when users interact with it (like loading a new page or submitting a form).
I retrieved the backend code by using the git clone command, which downloads the entire project repository from GitHub to my EC2 instance. This gives me all the source files I need to build, package, and eventually deploy the backend service to my Kubernetes cluster.
Container image
Once I cloned the backend code, my next step is to build a container image of the backend. This is because Kubernetes deploys applications using container images, which package the app code, dependencies, and environment into a portable format. By building a container image, I make sure my backend app can run consistently on any Kubernetes node, and it can be easily distributed, managed, and scaled across the cluster. This step prepares my application for cloud-native deployment and automation.
I also pushed the container image to a container registry, because Kubernetes needs to pull the image from a centralized, accessible location for deployment. To push the image to ECR, I selected my repository and clicked on "View push commands" to get the exact steps needed.
Since my ECR repository can store many versions of the same container image, I used tags to keep things organized. Tagging the Docker image (for example, with latest) is like giving it a nickname so I can easily refer to a specific version. This helps Kubernetes know which image version to use when deploying.
Then, I pushed the tagged image to ECR using the provided commands. Pushing uploads the container image to the remote repository—so now my image lives in ECR, ready for Kubernetes or other services to access and deploy!
Manifest files
Kubernetes manifests are like a set of instructions that tell Kubernetes how to run my app. They specify what my app needs—such as which containers to run, how many replicas to create, what resources to allocate, and how to expose the service. Manifests are written in YAML or JSON, and Kubernetes uses them to automate the setup and management of applications.
Manifests are helpful because they make deployment simple, clear, and consistent. Without manifests, Kubernetes wouldn’t know how to set up and manage my app automatically. I’d have to manually configure each container every time I deploy, which would be confusing, error-prone, and hard to repeat. With manifests, I can reliably deploy, update, and scale my app with ease.
Tip: In general (even outside of Kubernetes), a manifest is an instruction manual that tells a system how to set up and manage something.
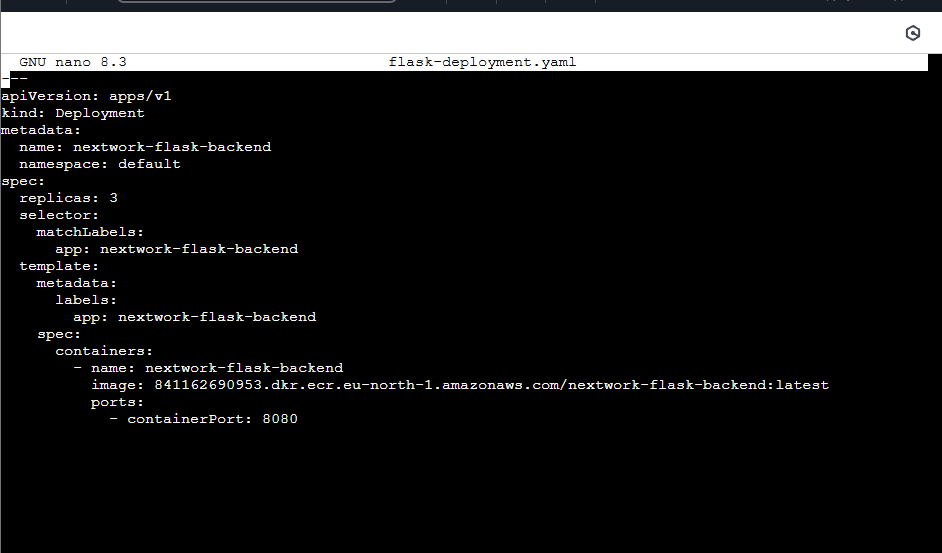
A Kubernetes deployment manages the rollout and lifecycle of application instances in your cluster. It automatically creates, updates, and maintains the desired number of replicas of your app, ensuring high availability and easy scaling. The deployment also handles updating your app safely, rolling back if something goes wrong, and helps keep your app running even if individual pods fail.
The container image URL in my Deployment manifest tells Kubernetes exactly which version of my app to run and where to pull the image from (like Amazon ECR). Kubernetes uses this URL to fetch the container image, create pods, and keep the application up and running in the cluster.
Service Manifest
A Kubernetes Service exposes your application running inside the cluster so that other services, users, or external systems can access it. It acts as a stable endpoint that routes traffic to the correct pods, even if their IP addresses change.
You need a Service manifest to define how Kubernetes should expose your backend app—whether it’s just inside the cluster, or to the outside world through a load balancer or NodePort. Without a Service, your app would be isolated and unreachable, making it impossible for users or other applications to connect to it.
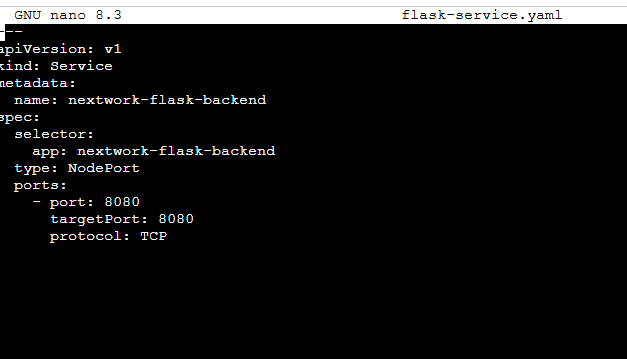
My Service manifest sets up a Kubernetes Service of type NodePort for my backend application. It does the following:
- Defines a Service named nextwork-flask-backend: This creates a stable network endpoint for my backend app.
- Uses a selector (app: nextwork-flask-backend): This tells Kubernetes to route traffic to pods labeled with app: nextwork-flask-backend, so only my backend pods receive traffic.
- Specifies the type as NodePort: This exposes my backend app on a port of each node in the cluster, making it accessible from outside the cluster (using the node’s IP and the assigned port).
- Maps port 8080: External requests to port 8080 on the Service are forwarded to port 8080 inside the backend pods, using the TCP protocol.
This manifest makes my Flask backend accessible to users or other services by routing traffic from the cluster nodes directly to my backend application.
Deployment Manifest
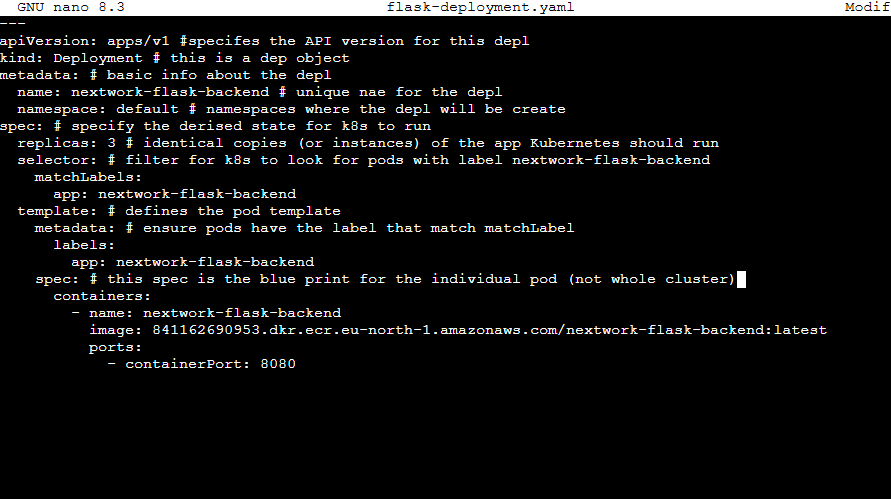
Annotating the Deployment manifest helped me understand each section and command, making it clear how Kubernetes sets up and manages my backend app. By adding comments and explanations, I could see exactly what each part does—like setting the number of replicas, choosing the container image, or labeling pods. This made troubleshooting easier, helped me avoid mistakes, and gave me confidence to update or share my manifest with others. Because of the annotations, the deployment process feels more transparent, organized, and easier to maintain in the future.
A notable line in the Deployment manifest is the number of replicas, which means how many copies of my backend app Kubernetes should run at the same time. This helps ensure high availability—if one copy (pod) fails, others keep my app running.
Pods are relevant to this because a pod is the smallest deployable unit in Kubernetes. Each replica creates a new pod, and each pod runs one or more containers (in this case, my backend app’s container). So, if I set replicas to 3, Kubernetes will keep 3 pods running, each with my app, spreading them across the cluster for reliability and scalability.
One part of the Deployment manifest I still want to know more about is the selector and matchLabels section. This section connects the Deployment to the pods it manages, but I want to understand exactly how Kubernetes uses these labels to identify and control the right pods.
Understanding this is important because it ensures my Deployment only manages the intended pods, helps with scaling, rolling updates, and avoids conflicts with other workloads running in the cluster. I’d like to know more about best practices for choosing labels and how these selectors work in more complex Kubernetes setups.