![]()
Set Up Kubernetes Deployment
Project Link: View Project
Author: Duc Thai
Email: ducthai060501@gmail.com
Set Up Kubernetes Deployment
Introducing Today's Project!
In this project, I will learn about setting up a Kubernetes deployment by cloning a backend app from GitHub, building a Docker image of that backend, pushing the image into Amazon ECR, and troubleshooting any problems or issues that come up... because I want to understand the full workflow of deploying containerized applications to Kubernetes on AWS. Mastering these steps will help me gain practical experience with cloud-native infrastructure, CI/CD pipelines, and container orchestration, which are essential skills for modern backend development and DevOps.
Tools and concepts
I used Amazon EKS, Git, Docker, and Amazon ECR to deploy a backend application to Kubernetes in the cloud.
Key steps include:
- Launching an EC2 instance to serve as my remote workstation.
- Setting up eksctl on the EC2 instance and assigning the correct IAM role to create and manage the EKS cluster.
- Creating an EKS cluster using eksctl, specifying the cluster name, node group, node type, and size.
- Cloning the backend code from GitHub using Git to get the application I want to deploy.
- Building a Docker container image of the backend app, including resolving any permissions errors for Docker access.
- Pushing the container image to Amazon ECR, a managed container registry, to store and share the image securely.
- Exploring the backend repository to understand how the app works and what dependencies it requires.
- Troubleshooting issues along the way, such as fixing Docker permissions errors.
Project reflection
This project took me approximately 1 hour to complete. The most challenging part was troubleshooting Docker permissions errors on my EC2 instance, since I had to figure out how to run Docker commands as a non-root user. My favourite part was seeing the backend app deployed to Kubernetes and successfully responding to API requests, which made all the setup and debugging worthwhile!
Something new that I learnt from this experience was how to use Amazon ECR as a secure, managed container registry for storing Docker images and integrating it with Kubernetes deployments on AWS. I also gained hands-on experience troubleshooting Docker permissions on EC2 and learned the importance of user groups for managing access. Overall, I developed a deeper understanding of the workflow for deploying a backend application from source code all the way to a live Kubernetes cluster in the cloud.
What I'm deploying
To set up today’s project, I launched a Kubernetes cluster on AWS. The steps I took included:
- Granting my EC2 instance AdministratorAccess permissions by assigning it the appropriate IAM role. This ensured my EC2 instance could create and manage AWS resources necessary for the cluster.
- Installing eksctl on my EC2 instance. eksctl is a command-line tool that simplifies the process of creating and managing EKS clusters.
- Running the eksctl create cluster command:
eksctl create cluster \
  --name nextwork-eks-cluster \
  --nodegroup-name nextwork-nodegroup \
  --node-type t3.micro \
  --nodes 3 \
  --nodes-min 1 \
  --nodes-max 3 \
  --version 1.33 \
  --region eu-north-1
This command created a new EKS cluster named nextwork-eks-cluster, set up a node group of t3.micro EC2 instances, specified the desired, minimum, and maximum number of nodes, set the Kubernetes version, and chose the AWS region.
I'm deploying an app's backend
Next, I retrieved the backend that I plan to deploy. The backend is the "brain" of an application—it processes user requests, stores and retrieves data, and handles the business logic behind the scenes. Unlike frontend code, which users see and interact with, backend code runs on the server side to ensure the app functions correctly when users interact with it (like loading a new page or submitting a form).
I retrieved the backend code by using the git clone command, which downloads the entire project repository from GitHub to my EC2 instance. This gives me all the source files I need to build, package, and eventually deploy the backend service to my Kubernetes cluster.

Building a container image
Once I cloned the backend code, my next step is to build a container image of the backend. This is because Kubernetes deploys applications using container images, which package the app code, dependencies, and environment into a portable format. By building a container image, I make sure my backend app can run consistently on any Kubernetes node, and it can be easily distributed, managed, and scaled across the cluster. This step prepares my application for cloud-native deployment and automation.
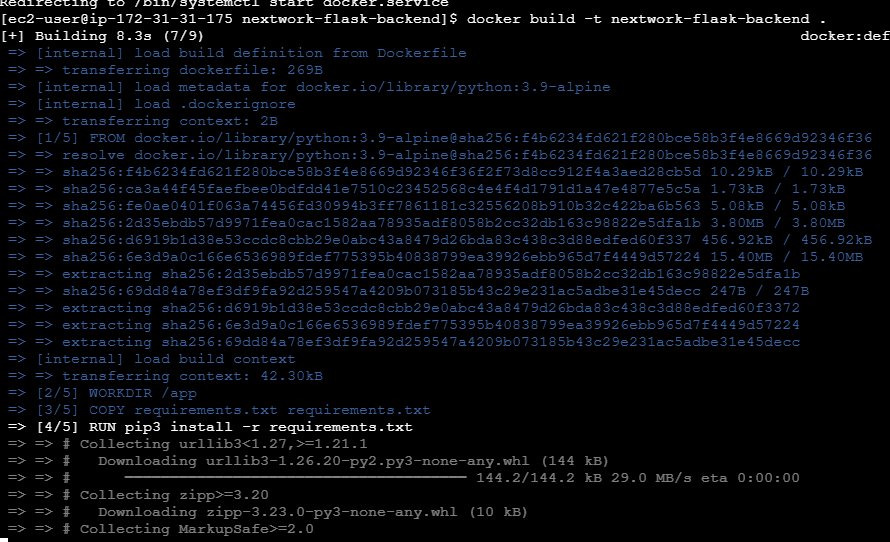
When I tried to build a Docker image of the backend, I ran into a permissions error because I am not the root user. The commands I ran to install and start Docker were:
sudo yum install -y docker
sudo service docker start
These worked because they're prefixed with sudo, which lets a non-root user run commands with root privileges. However, it’s better practice to give my ec2-user permission to run Docker without always using sudo.
When you launch an EC2 instance using certain AMIs (like Amazon Linux), the default user for SSH access is ec2-user. This user isn’t the root user, but it does have the ability to elevate permissions using sudo. If you try to run Docker commands as ec2-user without sudo, you’ll get a permissions error because Docker requires root-level access to manage containers and images.
To solve the permissions error, I first ran whoami in the terminal to confirm my username (which was ec2-user). After that, I ran:
sudo usermod -aG docker ec2-userThe docker group is a special group in Linux systems that grants users permission to run Docker commands. By default, only the root user can run Docker commands. When I add a user (like ec2-user) to the Docker group, it allows that user to execute Docker commands without needing to type sudo every time. This makes working with Docker much easier and follows good practice for managing user permissions safely.
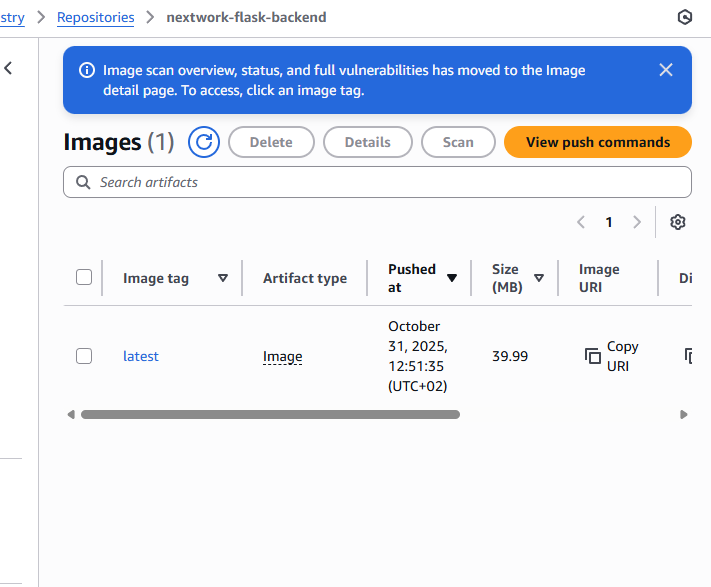
Container Registry
I'm using Amazon ECR in this project to store and manage the container image of my backend application. ECR is a good choice for the job because it’s a fully managed, secure, and scalable container registry service provided by AWS. It integrates seamlessly with other AWS services like EKS (Kubernetes), making it easy for my cluster to pull images for deployment. ECR also supports access control, automation, and fast image retrieval, which helps streamline my workflow and ensures my images are reliably available for my deployments.
Container registries like Amazon ECR are great for Kubernetes deployment because they provide a centralized, secure, and scalable location to store and manage container images. This makes it easy for Kubernetes to pull the exact app images it needs for deployment, ensures consistency across environments, and allows for version control and easy sharing. Additionally, registries integrate with access controls, automation tools, and monitoring systems, making deployments safer, faster, and more reliable.
EXTRA: Backend Explained
After reviewing the app’s backend code, I’ve learnt that it’s built as a Python Flask application that exposes a REST API for searching Hacker News stories by topic. The backend uses the Flask and flask_restx libraries to handle HTTP requests and structure the API, and it retrieves and processes data from the Hacker News Algolia search API.
The app’s dependencies are managed with a requirements.txt file, making it easy to reproduce the environment. The Dockerfile provides clear steps for packaging the backend into a container image, ensuring consistent deployment.
Overall, the backend is well-structured for cloud-native deployment, and I now understand how it handles requests, processes external API data, and serves results. This knowledge helps me troubleshoot, optimize, and confidently deploy the app in Kubernetes.
Unpacking three key backend files
The requirements.txt file lists the dependencies my Python Flask app needs to run. Whenever you set up or deploy the backend, you (or Docker) can use this file to automatically install all the required packages with a single command like pip install -r requirements.txt. This makes it easy to ensure your app always has the correct versions of libraries and modules, and helps others quickly set up the development or production environment.
The Dockerfile gives Docker instructions on how to build a container image for your backend application. It describes each step needed to set up a consistent environment where your app can run, including which base image to use, what dependencies to install, and how to start the app.
Key commands in this Dockerfile include:
- FROM python:3.9-alpine: Sets the base image to a lightweight version of Python 3.9.
- LABEL Author="NextWork": Adds metadata about the image author.
- WORKDIR /app: Sets
/appas the working directory inside the container. - COPY requirements.txt requirements.txt: Copies the
requirements.txtfile into the container. - RUN pip3 install -r requirements.txt: Installs dependencies listed in
requirements.txt. - COPY . .: Copies all files from your project into the container.
- CMD ["python3", "app.py"]: Specifies the command to run when the container starts (launches your Flask app).
This setup ensures that your app runs reliably.
The app.py file contains the main code for the backend Flask application. It does the following:
- Imports necessary libraries: Flask for web server functionality, flask_restx for building REST APIs, requests for making HTTP requests, and json for handling JSON data.
- Creates a Flask app and API: Sets up the Flask application and REST API.
- Defines an endpoint
/contents/<string:topic>: This endpoint lets users search for content related to a topic. - Handles GET requests: When someone accesses this endpoint with a topic, the app sends a request to the Hacker News Algolia API to search for stories matching that topic.
- Processes and filters the results: It checks each result for a title and URL, collects them into a list, and formats them as JSON.
- Returns the results: The results are returned as a JSON response, with CORS headers added so that the API can be accessed from any origin.
- Runs the app: bing bong!