🐳 Deploy an App with Docker
![]()
Project Link: View Project
Author: Duc Thai
Email: ducthai060501@gmail.com
🎯 Introducing Today's Project!
What is Docker?
Docker is a platform that lets you package your application and all its dependencies into containers, making them easy to run anywhere. It is useful because containers ensure your app works consistently across different computers and environments, simplify deployment, and speed up development. I used Docker in this project to build, test, and deploy my app as a container—so I could easily run it locally and then launch it in the cloud without worrying about setup differences.
One thing I didn't expect...
One thing I didn't expect in this project was how easy it was to update and redeploy my app using Docker and Elastic Beanstalk. After making changes locally, I just had to package my files and upload them—no complicated setup or manual configuration needed. The process was much smoother and faster than I anticipated!
This project took me...
This project took me approximately 1 hour.
The most challenging part was troubleshooting the port conflict when running multiple containers, which taught me a lot about Docker networking and container management.
It was most rewarding to see my custom web app deployed and live on the internet using Elastic Beanstalk, knowing I could update and redeploy changes anytime!
📦 Understanding Containers and Docker
Containers
Containers are packages that bundle your application and everything it needs to run—such as libraries, dependencies, and configuration—into one file. This makes it easy for other developers to run your application reliably, no matter their environment. They are useful because they ensure consistency across development, testing, and production, simplify deployment, and help you avoid the "it works on my machine" problem.
A container image is a blueprint or template for making containers. It tells Docker exactly what to put inside each container - things like your app's code, the libraries it needs, and any other required files.
Docker
Docker is a platform that helps you create, manage, and deploy containers efficiently. You can think of Docker as a tool that packages your application and its dependencies into portable containers, making it easy to run anywhere.
Docker Desktop is the user-friendly application for Windows and Mac that provides everything you need to build, run, and manage Docker containers locally. It includes a graphical interface, command-line tools, and all required services so you can easily develop and test containerized applications on your computer.
The Docker daemon is the engine that actually 🪄 does the thing 🪄 when you run Docker commands, such as creating or starting a container.
In more technical terms, the Docker daemon is a background process running on your computer that manages Docker containers. It listens for commands from the Docker client (like commands you type in the terminal or actions you perform in Docker Desktop), and it handles the work of building, running, stopping, and distributing containers. The daemon is what makes Docker work behind the scenes, coordinating all container activity on your system.
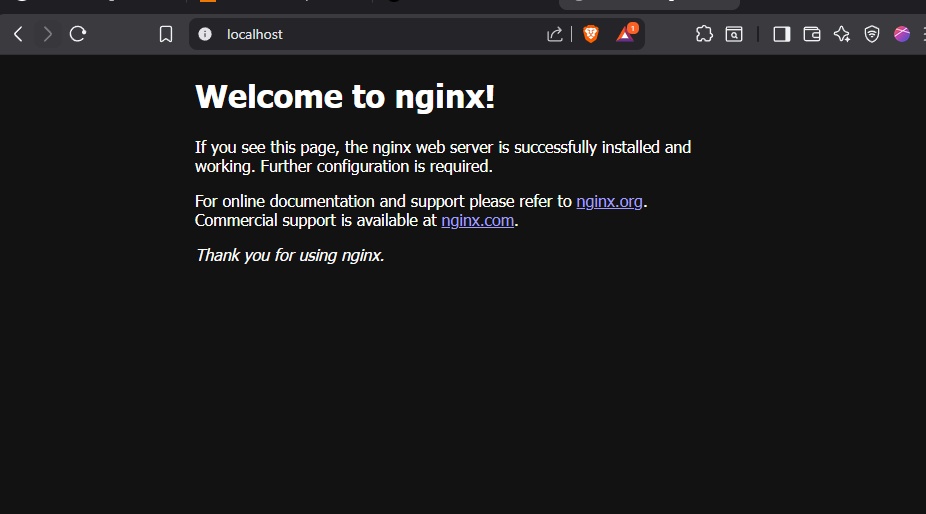
🌐 Running an Nginx Image
Nginx is a web server, which is the program use to run website and webapp. If you want people to visit your site, you're going to need a web server to deliver your website's files to their browsers!
Engineers pick Nginx when they need to manage lots of visitors at once, making sure your site doesn't slow down when traffic spikes. Nginx is also the web server of choice for containerized apps because it's lighter and uses less memory, compared to other options like Apache.
The command I ran to start a new container was:
docker run -d -p 80:80 nginx
docker run starts a new container. I used the pre-existing container image called nginx and started it in detached mode (-d), so it runs in the background. The -p 80:80 option maps port 80 on my host machine to port 80 in the container, allowing me to access the Nginx web page from my computer's web browser.
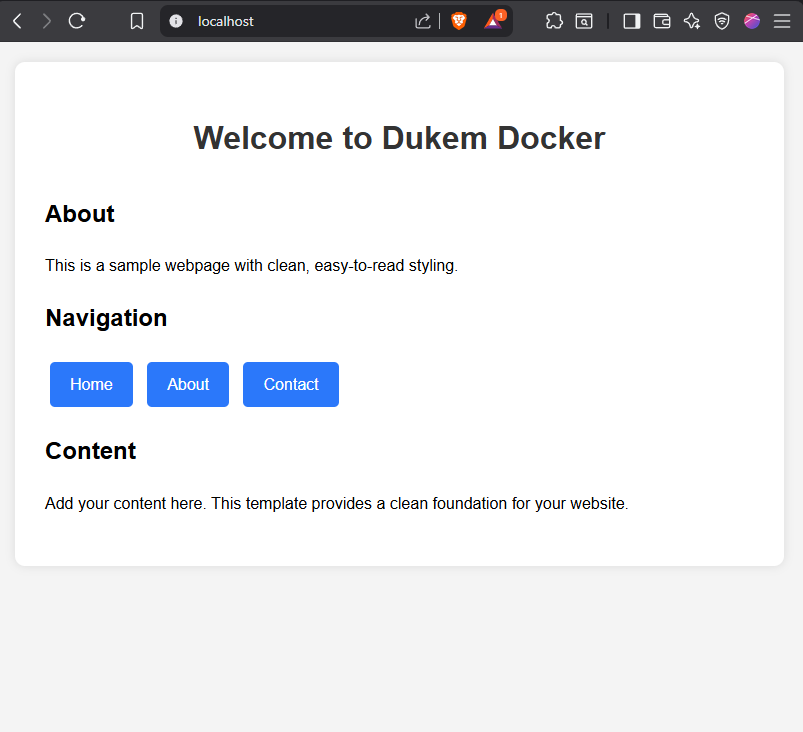
🛠️ Creating a Custom Image
The Dockerfile is a document with all the instructions for building your Docker image. Docker would read a Dockerfile to understand how to set up your application's environment and which software packages it should install.
My Dockerfile tells Docker three things:
- FROM nginx:latest
This sets the base image to the latest official Nginx image. It's like starting with a ready-made web server setup so you don't have to configure everything yourself. - COPY index.html /usr/share/nginx/html/
This replaces the default Nginx homepage with your own customindex.htmlfile. Now, when someone visits your site, they'll see your content instead of the default Nginx page. - EXPOSE 80
This tells Docker that your container will listen for web traffic on port 80. It makes it easier for users and services to access my web app.
These steps let you quickly customize and deploy a web server using Docker.
The command I used to build a custom image with my Dockerfile was:
docker build -t my-web-app .
This tells Docker to build an image named my-web-app using the instructions in my Dockerfile. The . at the end of the command means "use the current directory as the build context," so Docker will look for the Dockerfile and any needed files here.

🚀 Running My Custom Image
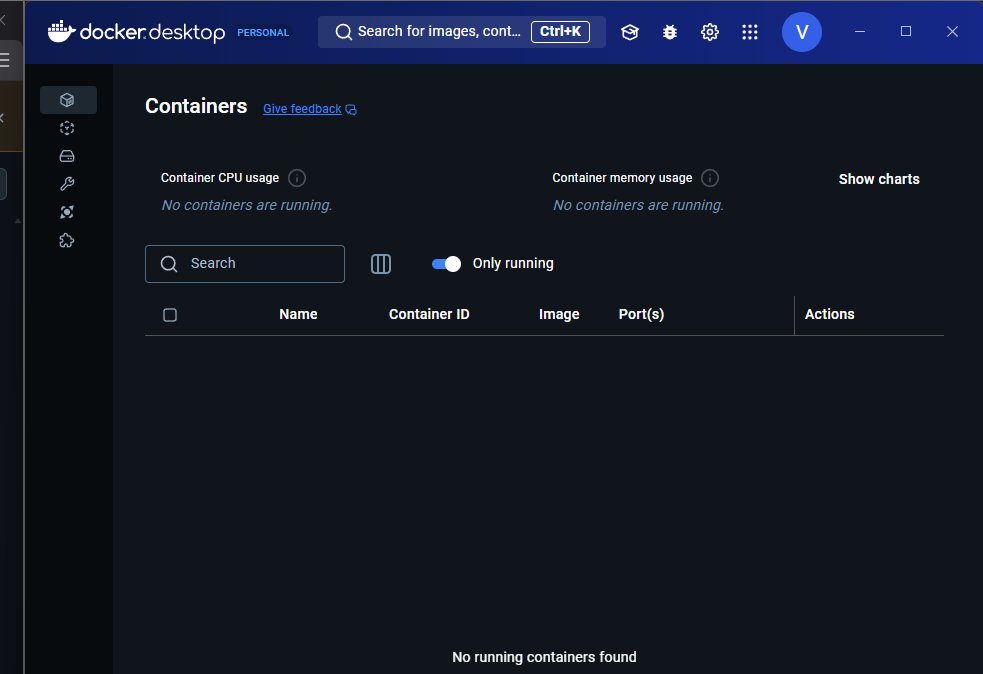
There was an error when I ran my custom image because another container was already using port 80. This prevented my new container from accessing that port, causing a conflict.
I resolved this by checking Docker Desktop to see which container was running on port 80 (or by running docker ps --filter "publish=80" in the terminal to list containers using port 80). The running container was highlighted in green, confirming it was active and using ports 80:80.
The image name for the running container was nginx, which was the container I created earlier in 🖼️ Step #2 with the command docker run -d -p 80:80 nginx. So, the culprit was my previous Nginx container still running and occupying port 80.
In this example, the container image is the blueprint that tells Docker the application code, dependencies, libraries etc that should go into a container. The container is the actual software that's created from this image and running the web server displaying my index.html.
☁️ Elastic Beanstalk
AWS Elastic Beanstalk is a service that makes it easy to deploy cloud applications without worrying about the underlying infrastructure. You simply upload your code and Elastic Beanstalk handles everything needed to get it running, like setting up servers, managing scaling, and monitoring health. This lets you focus on your application code instead of cloud infrastructure management.
In more technical terms, Elastic Beanstalk takes care of:
- Capacity provisioning
- Load balancing
- Auto-scaling
- Application health monitoring
💡 How is Elastic Beanstalk related to containers and Docker?
Elastic Beanstalk is AWS's managed way to run your Docker containers in the cloud. You build and test your app locally, package it as a Docker image, and then let Elastic Beanstalk deploy it. The service automatically spins up servers, launches your container, and keeps everything running—so you don't have to worry about manual setup or infrastructure details.
Deploying my custom image with Elastic Beanstalk took me just a few minutes, since my website was fairly simple.
Here are my settings:
- Application name: NextWork App
- Application code: a zip file
- EC2 instance profile: ecsInstanceRole
- Public IP address: true
- Root volume type: gp3
- Environment type: Single instance
- System: basic
- Managed updates: Disabled
- Deployment policy: AllAtOnce
With these settings, the deployment was quick and straightforward!
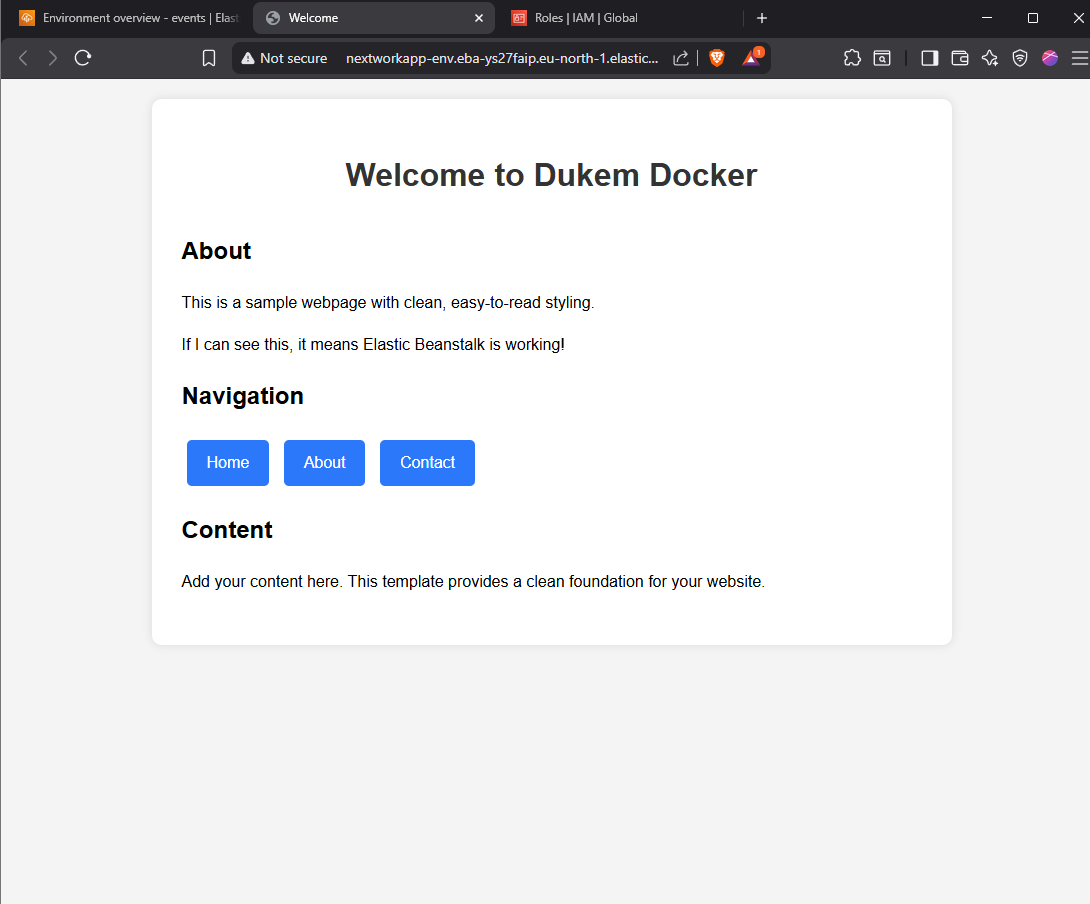
🔄 Deploying App Updates
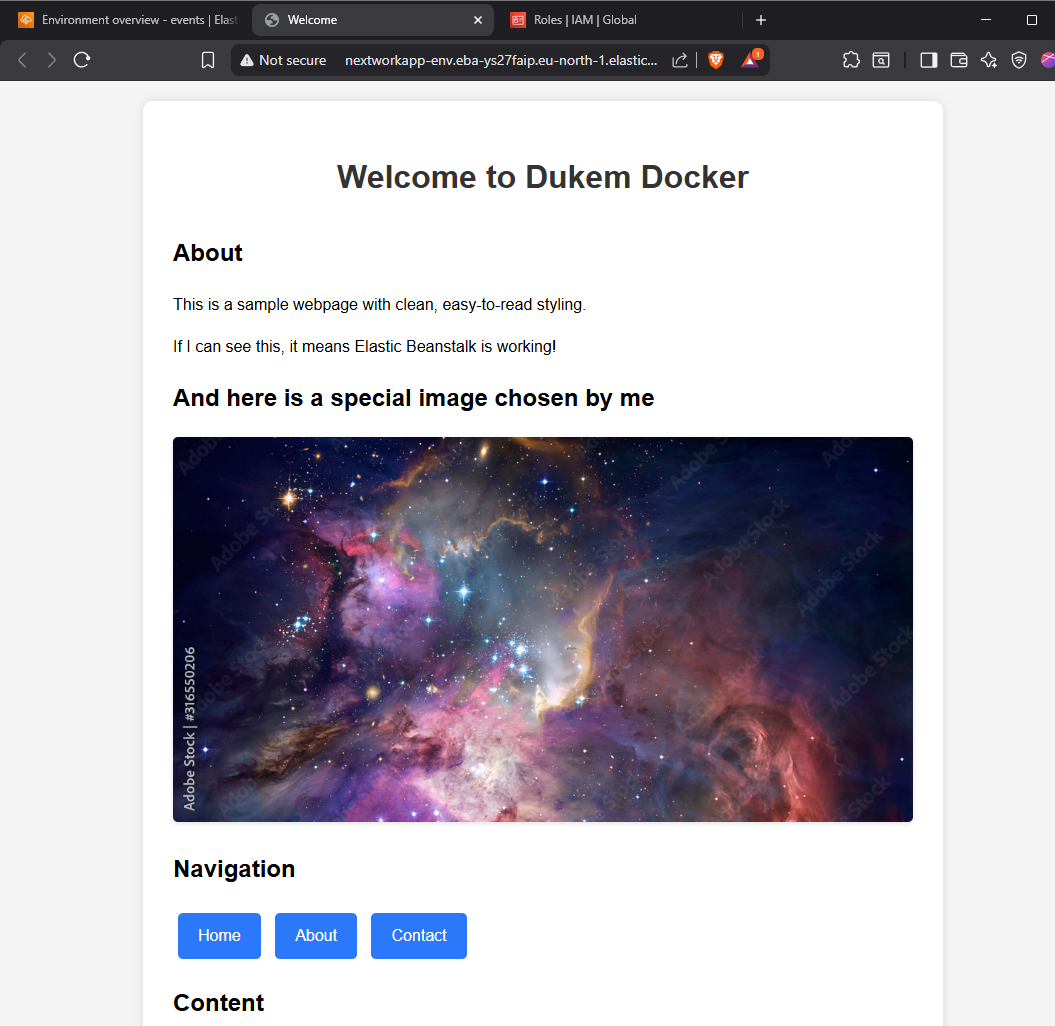
To learn how to deploy app updates with Elastic Beanstalk, I updated my app by adding a stylish header and an image to make my web app look more polished ✨.
- I added a
<h2>tag for a subheading:
"And here's a special image chosen by me" - I included an
<img>tag to display an image, using thesrc=""attribute to specify the image URL, and used thestyleattribute to control the image size so it fits nicely on the page.
I verified these changes by opening my updated index.html in my web browser and confirming the new header and image appeared as expected.
To deploy my app updates, I realized the changes I made to index.html were only saved locally, so Elastic Beanstalk was still serving the old version from the original zip file I uploaded.
To get my updates live, I compressed the updated index.html and Dockerfile into a new zip file. Then, I went to Elastic Beanstalk, clicked "Upload and Deploy," and selected the new zip file. This pushed my changes to the cloud, and my live environment started showing the new version of my app.
Project Duration: 1 hour
Project Source: NextWork.org
Contact: ducthai060501@gmail.com